
Bunny Sausage bun
Servings: 8 Rolls
Ingredients
For the dough
- 250 g bread Flour 2 cup
- 50 g cake flour 1⁄3 cup
- 30 g sugar 2 tablespoon + 1 tsp
- 20 g condensed milk 1 tablespoon
- 85 g cold water 1⁄3 cup + 1 tsp
- 80 g cold milk 1⁄3 cup, preferably whole milk
- 1 large egg
- 1 teaspoon instant yeast
- 4 g sea salt ½ tsp
- 30 g cold unsalted butter 2 tbsp, cut into 6 small pieces
Others
- 4 hot dogs see notes
- 1 tablespoon chocolate chips
- ketchup optional
- herbs parsley, rosemary or lavender, etc
Instructions
Forming the dough
- Add flour, sugar, condensed milk, milk, water, 25 g of the egg (about half of the egg, store the rest in the fridge for brushing) and yeast into the stand mixer and knead on low speed until the dough is formed.
- Cover the mixing bowl and let it rest for 30 minutes.
- When it's done resting, add salt and continue to knead the dough until you can pull and stretch the dough for 2 inches without breaking.
- Add butter cubes one at a time and knead until the dough is very smooth and passes the windowpane test. (This step takes me about 6 minutes, with 5 minutes on low speed and 1 minute on medium speed. The actual time it takes you depends on your mixer.)
- Form the dough into a ball (it will be very sticky, but if it's too sticky to handle, then add a little bread flour and knead for another 1~2 minutes) and put it in a lightly greased bowl. Cover, and let it rise for 1 hour to 1.5 hours in a warm place (about 82°F to 90°F) until it doubles in size.
- Transfer the dough onto a working surface and cut it into 8 even pieces. Form each piece into a ball by tucking the edge to the bottom, cover with a piece of greased plastic wrap and let it rest for 5 minutes.
Shaping & Assembling
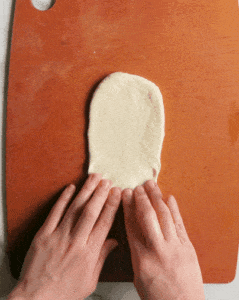
- Take one piece of dough, press it flat and roll it tightly into a log. (See the gif for reference). Repeat this step for the rest of the buns and arrange it in the order that they were rolled. Cover and let the buns rest for 10~15 minutes.
- Meanwhile, pat dry the hot dogs and cut each piece into half in a 45° angle, to make them a bit longer.
- Take the first bun (the one you first rolled) and roll it into a long, even and thin log, about 15" (40 cm) long, and eliminate all the air pockets. You will need to use some effort here as the log will keep shrinking back.
- Place the thin log into a U shape, place a piece of hot dog on it, feed both ends into the hole, one at a time. (See pictures in the post)
- Pull the "bunny ears" out a bit more to make the hot dog fit more snugly in the bun. Make the ears longer than you'd like, since they will shorten after baking. Pinch the back together to eliminate the gap (see picture in the post) before placing bun on a lined baking sheet.
- Repeat the process for the rest of the buns (working on them in order) and let them proof in a warm place (around 82 to 90°F) for about an hour until they're puffy and they spring back a bit to the touch.
- Preheat the oven to 375°F (190°C) towards the end of the proofing process.
- Brush the rolls with a thin layer of egg wash before placing them in the oven. Bake for 12~14 minutes until golden brown. Place the rolls on a cooling rack to cool down.
Decorating
- Meanwhile, put chocolate chips in a piping bag or the corner of a ziploc bag and soak in hot water to melt.
- Once the rolls are cool, cut the tip of the bag and squeeze the chocolate out of the bag to draw eyes on the bunny's face and put a bit of ketchup on the cheek if desired.
- Use a skewer to poke a hole at the end of the hot dog and put the stem of the herb in the hole to be the "carrot's leaves".
- If you are not eating these in the same day, the best way is to store them in the freezer once the rolls are cool, and decorate them after reheating on the day you want to eat them.
Notes
This recipe is developed and tested in gram, if you would like to make this recipe, a kitchen scale is highly recommended. I used the OXO scale that's recommended by Cook's Illustrated, but any cheaper one will work just fine!