

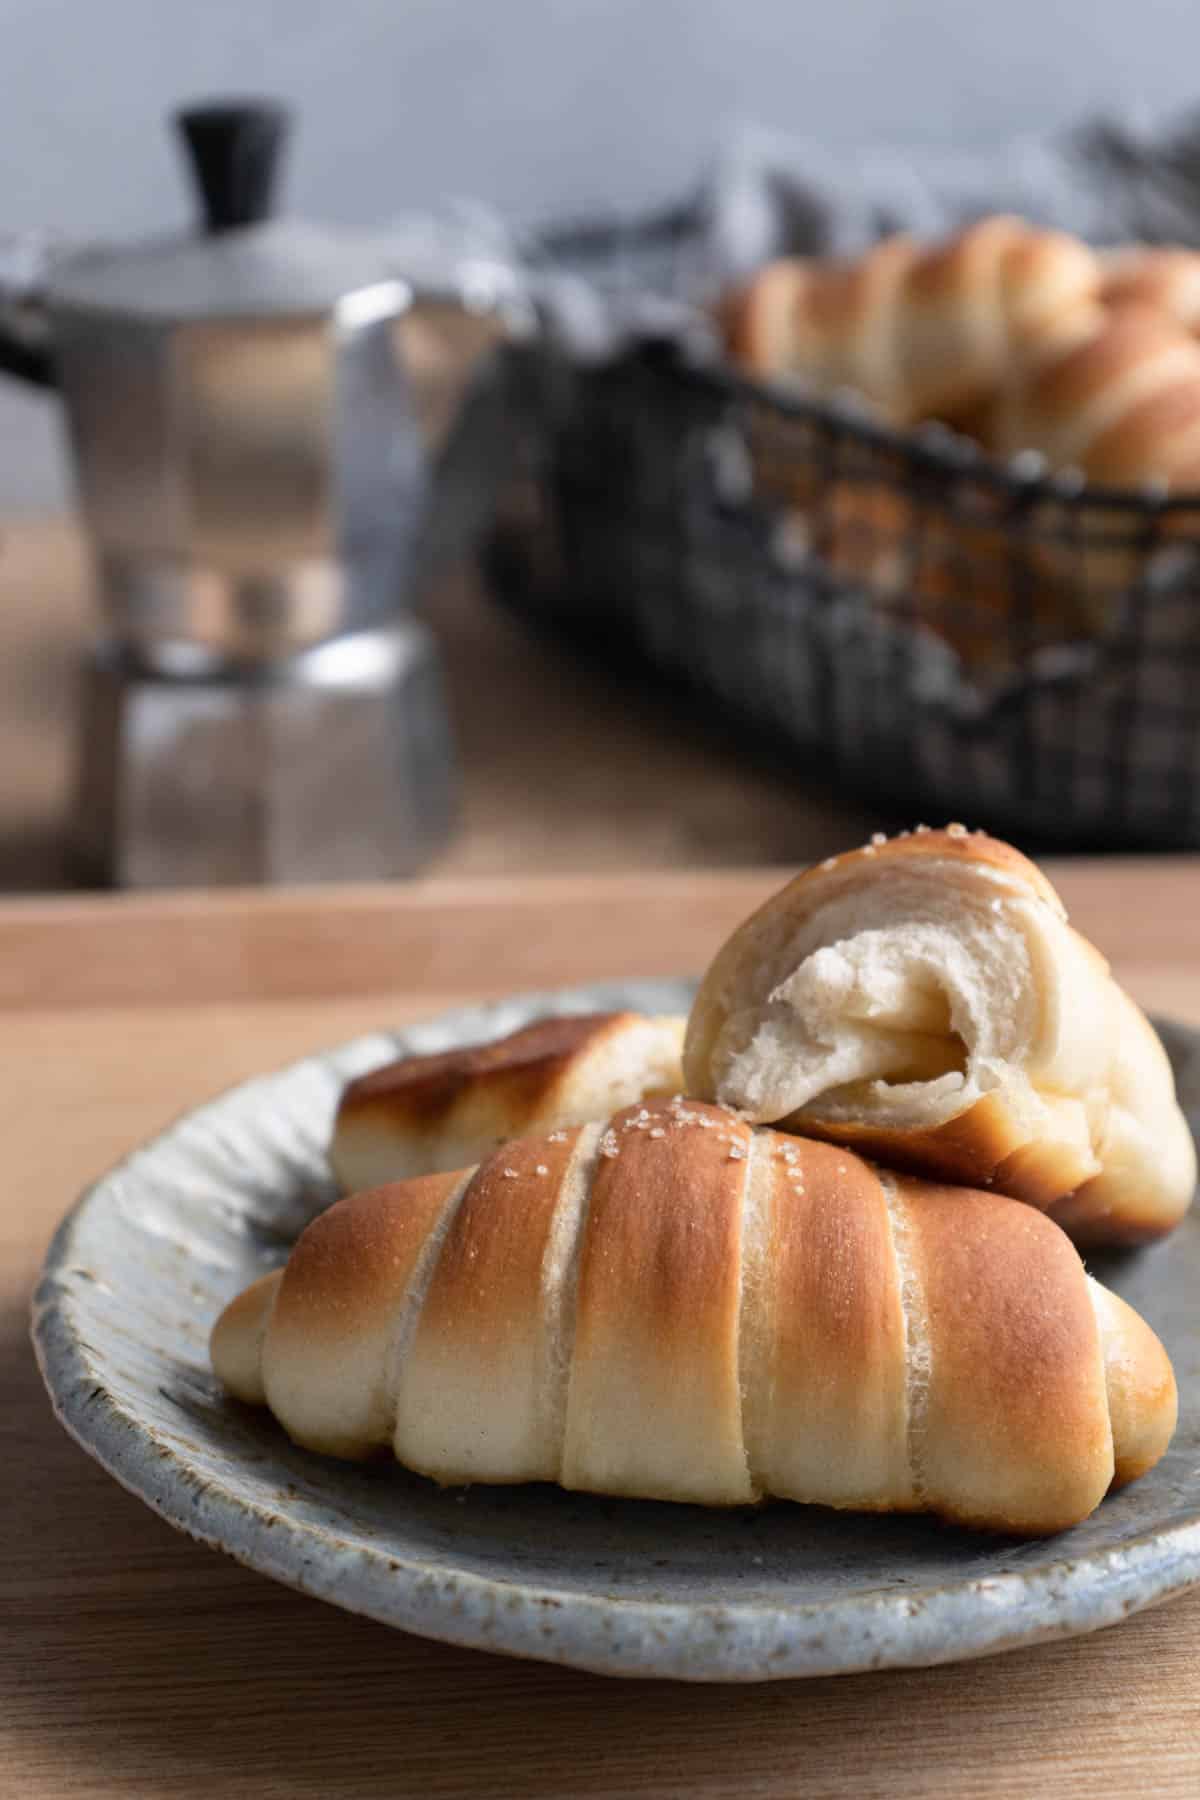
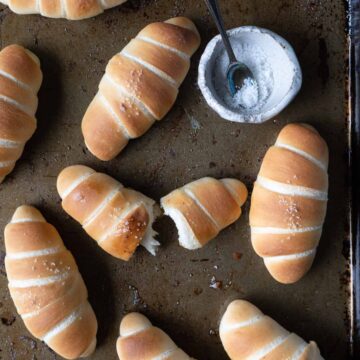
Shio pan is soft and fluffy on the inside, yet it packs a satisfying crunch with its crust and uniquely buttery and crunchy bottom. My recipe uses a sponge method and includes yogurt in the dough; this gives the bread a more complex flavor with softer and lighter texture.
Shio pan was originated in Japan and has become very popular in Taiwan in the past few years. People would even line up in front of the bakeries before they open in order to buy shio pan.
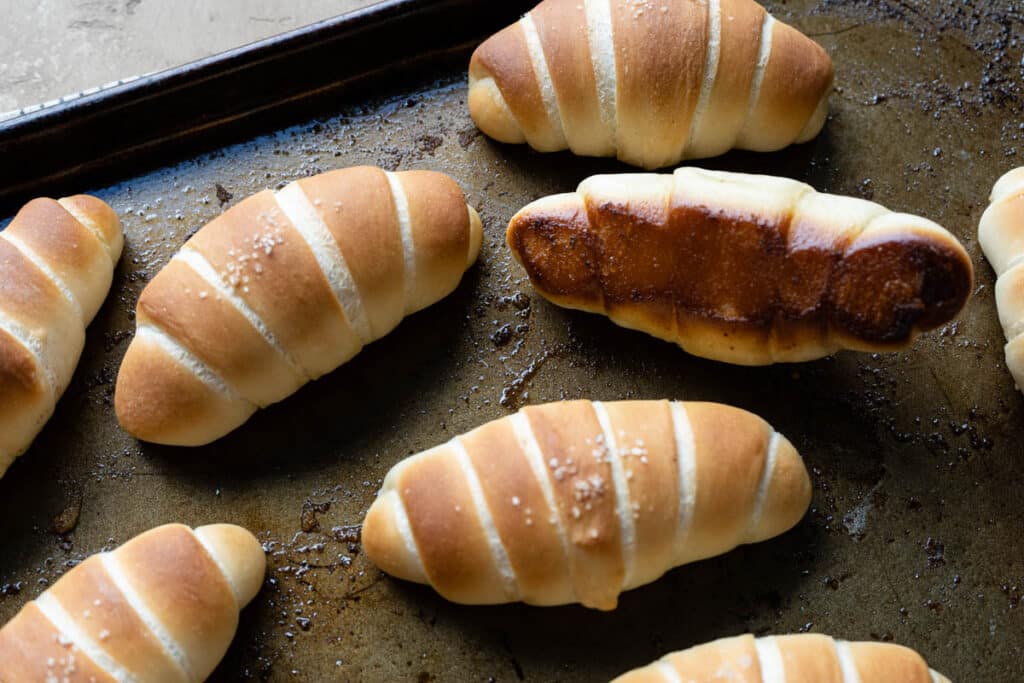
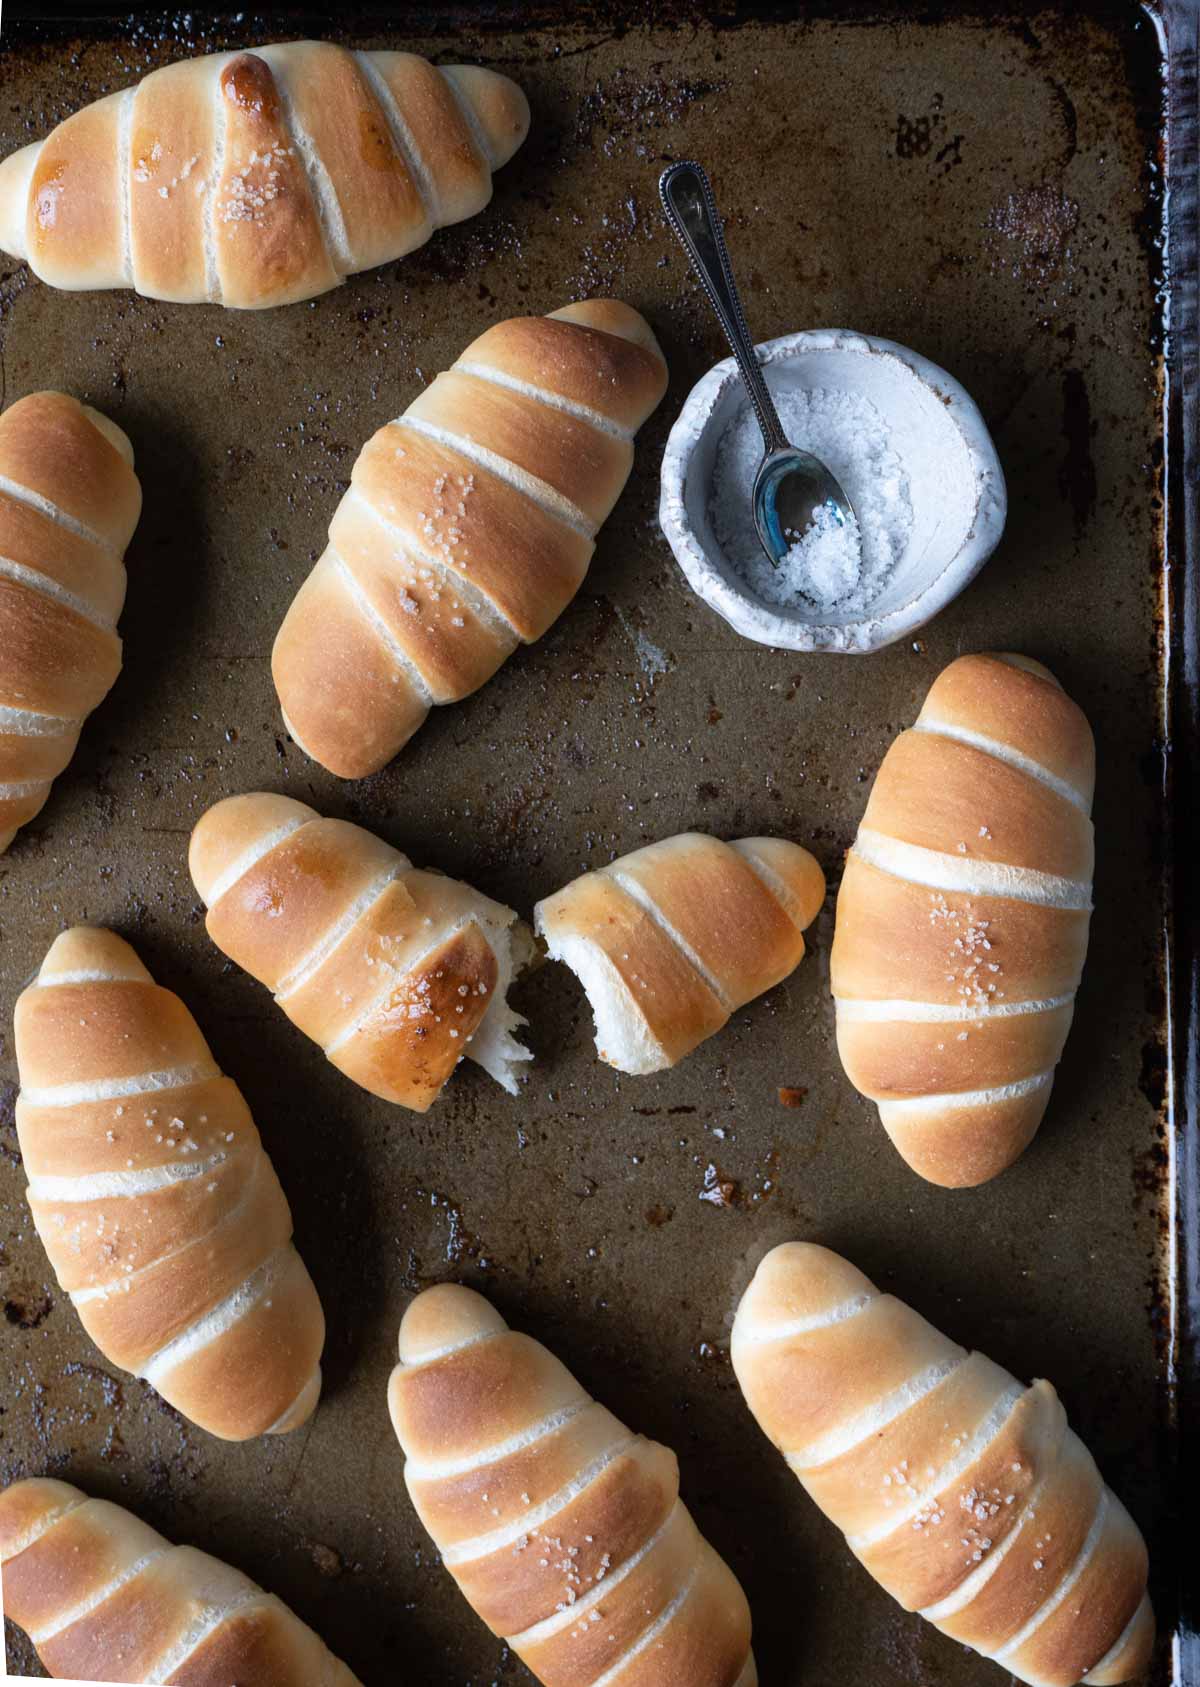
The best part of shio pan is the crunchy, buttery bottom that smells and tastes amazing. When the bread is baking, the salted butter that's rolled inside the bread melts and flows to the bottom, so the bottom part is "fried" in the butter. The butter eventually becomes brown butter and gives a delightful aroma to the bread.
After making more than 150 shio pans with different recipes, I came up with this recipe that I'm really satisfied with in both appearance and taste. They are so delicious that it's impossible to just eat one!
Why You Should Try This Recipe
- If you haven't tried this before, once you try it you'll understand why people line up out the door for them!
- You only need a few ingredients that you probably already have at home.
- Using sponge method makes the bread extra flavorful and tasty!
- I will show you how to make the best shio pan with a helpful video, step by step pictures and clear instructions.
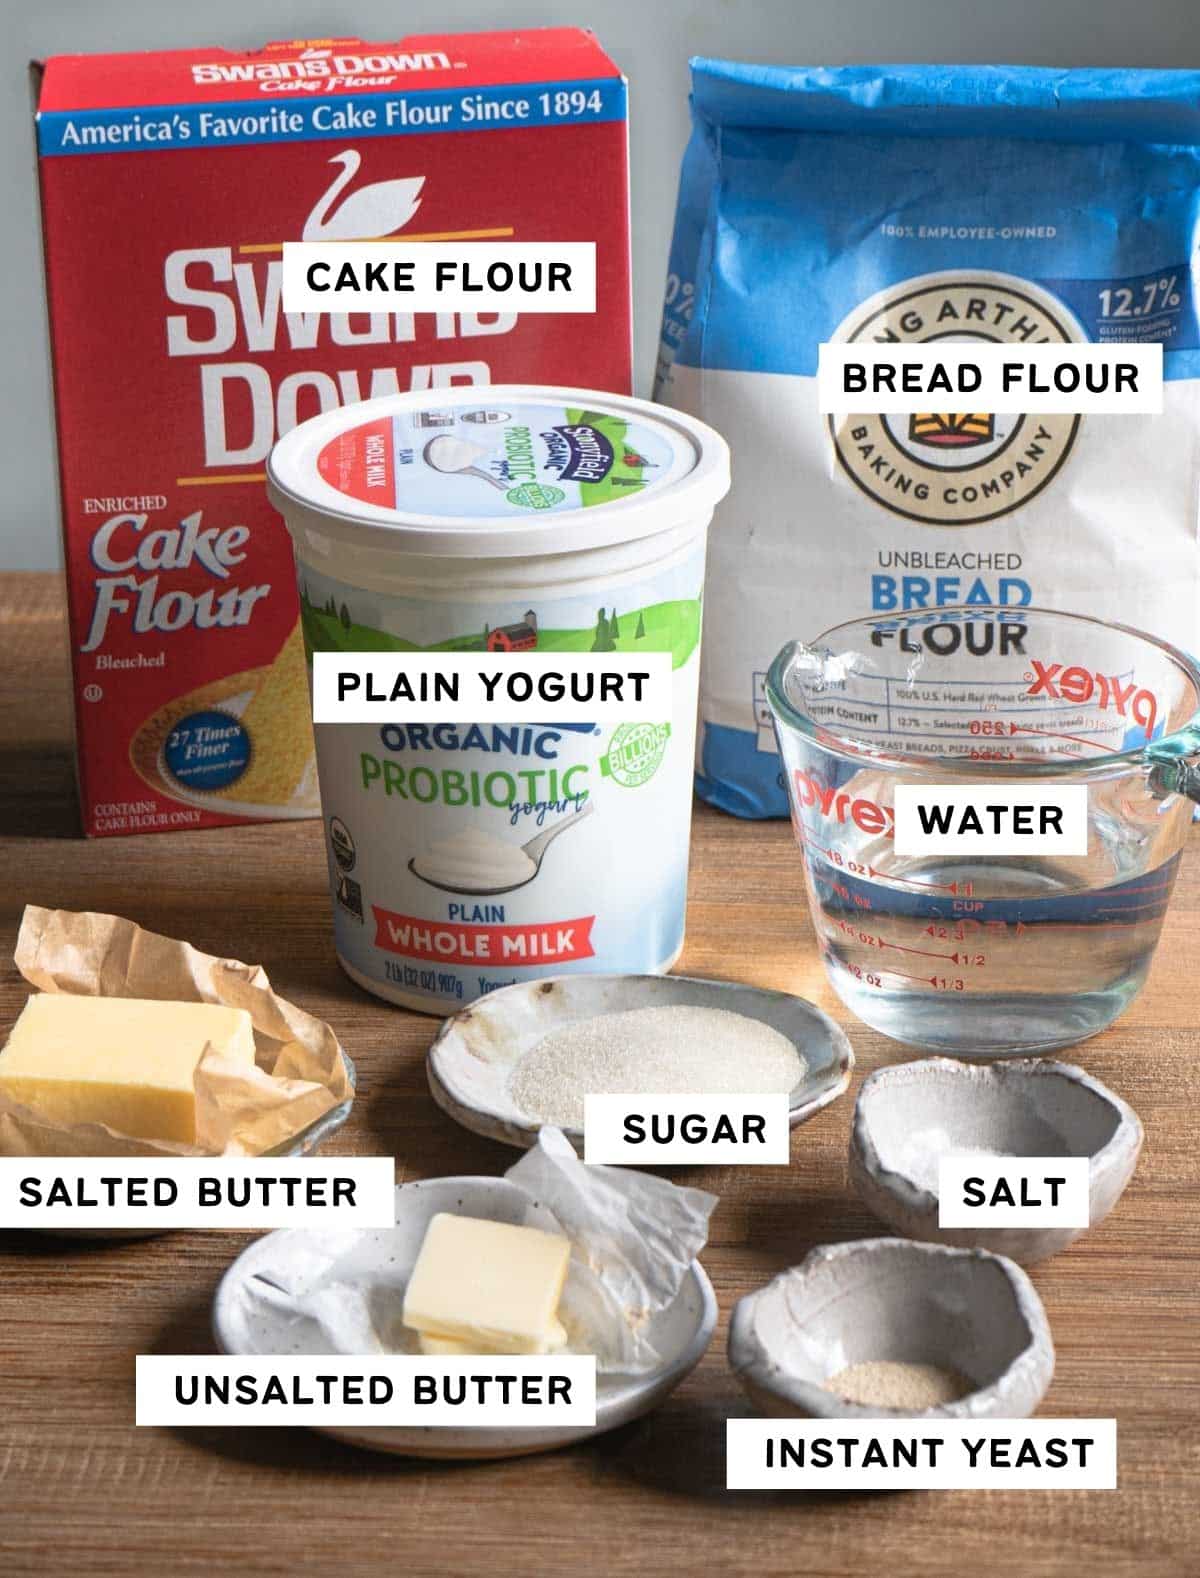
Ingredients You'll Need
Here are the main ingredients you'll need for making this recipe. Check the recipe box below for the full ingredient list with actual measurement.
Notes
- Cake flour - Adding cake flour gives the bread a lighter and softer texture.
- Butter - We will use unsalted butter in the bread dough and salted butter to roll in the bread. Using good quality salted butter is the key to make tasty shio pan. I recommend using European-style butter, like Kerrygold or President.
- Sea salt - Use fine sea salt in the dough and flaky sea salt (I use fleur de sel) to sprinkle on the top.
Step by Step Instructions
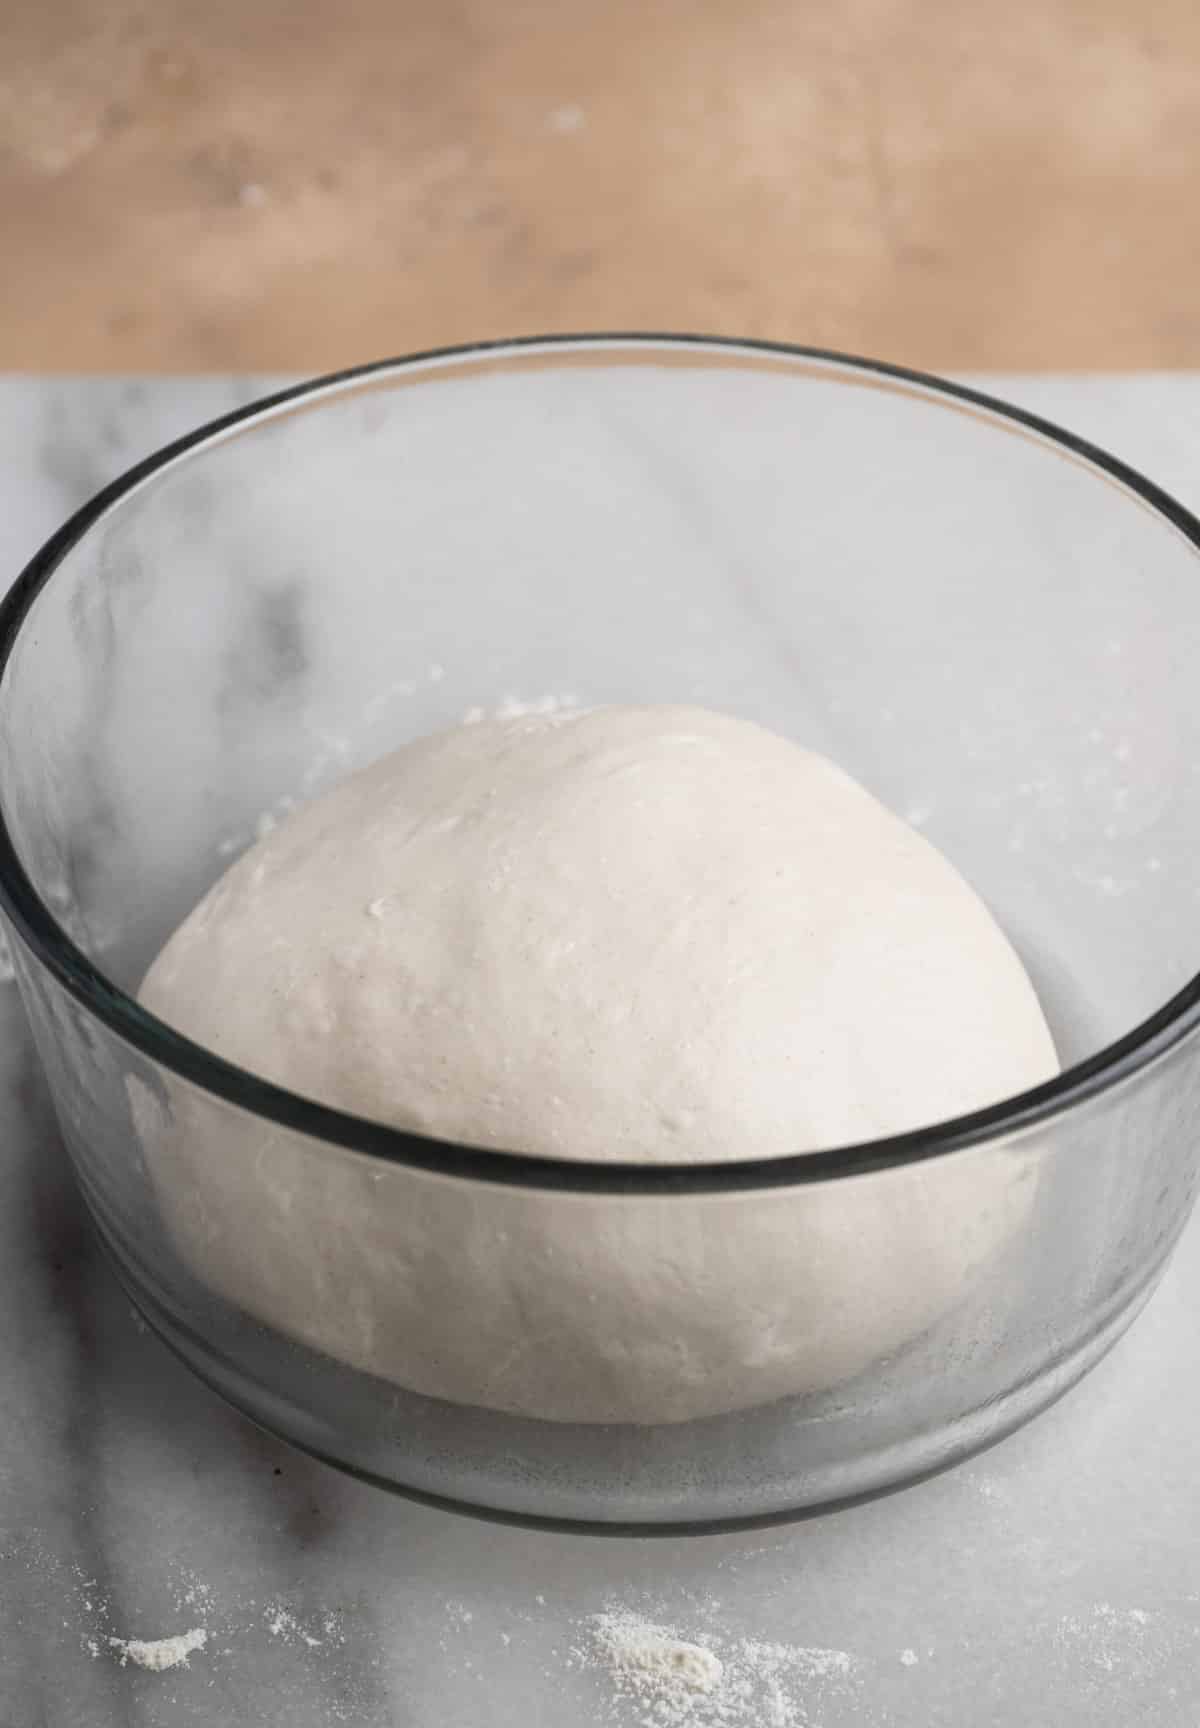
Step 1 - Make sponge starter the day before.
Mix instant yeast with warm water before stirring in yogurt and bread flour. Stir in the same direction for about 30 seconds until it's well combined.
Cover the bowl with plastic wrap and let it sit on the counter for about 40 minutes to an hour before storing in the fridge overnight.
The volume of the sponge starter should roughly triple by the next day. Make sure you use it within three days for the best result.


Step 2 - Make bread dough.
Add all the dough ingredients except salt into a stand mixer, knead for 10 minutes on medium speed before adding salt and knead for another 10-15 minutes until the dough is smooth and passes the windowpane test.
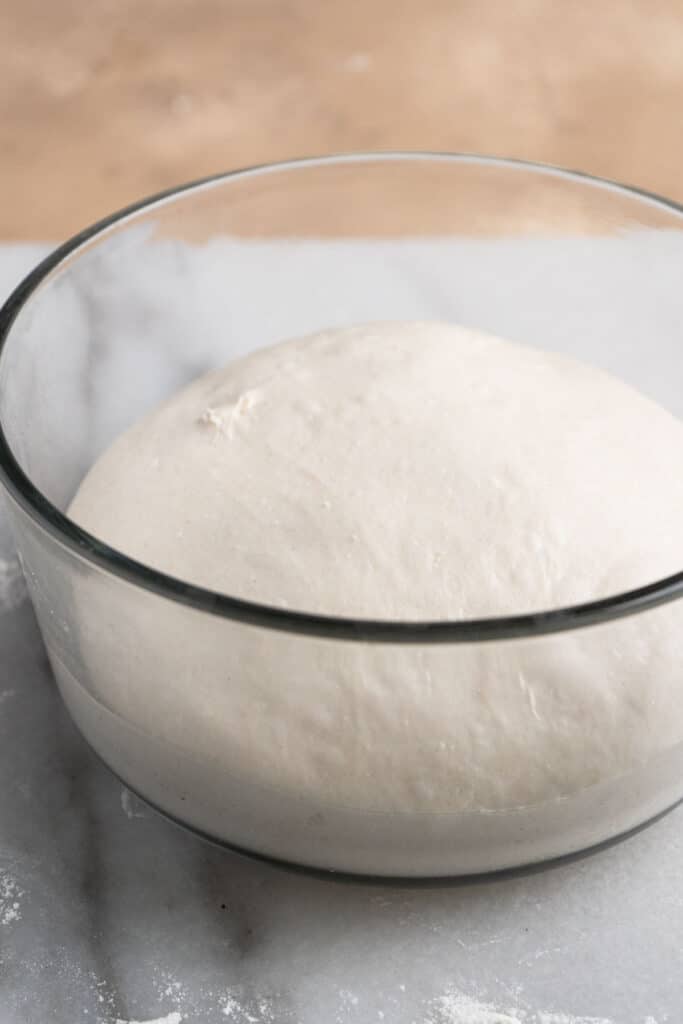
Take the dough out from the mixer, form it into a ball by folding the edges to the center and pinching together. The dough should be soft and fairly easy to handle.
Put it seam side down in a lightly greased bowl, cover, and let it rise for 40 minutes to 1 hour in room temperature until the dough almost doubles in size.
Quick tip - If you find it difficult to tell whether it has doubled in size or not, place the dough in a container with about double of the volume of the dough. That way, when the dough nearly fills the container, you know it's done proofing.
Step 3 - Prepare salted butter.
While the dough is proofing, cut salted butter into 10 even pieces that's 5g with the dimension around 0.5(L) x 1.5(W) x 0.5(H) inches, which is about 1.25(L) x 3.5(W) x 1.25(H) cm. Store them in the freezer until it's ready to use.

Step 4 - Assemble shio pan (please see the video for instructions).
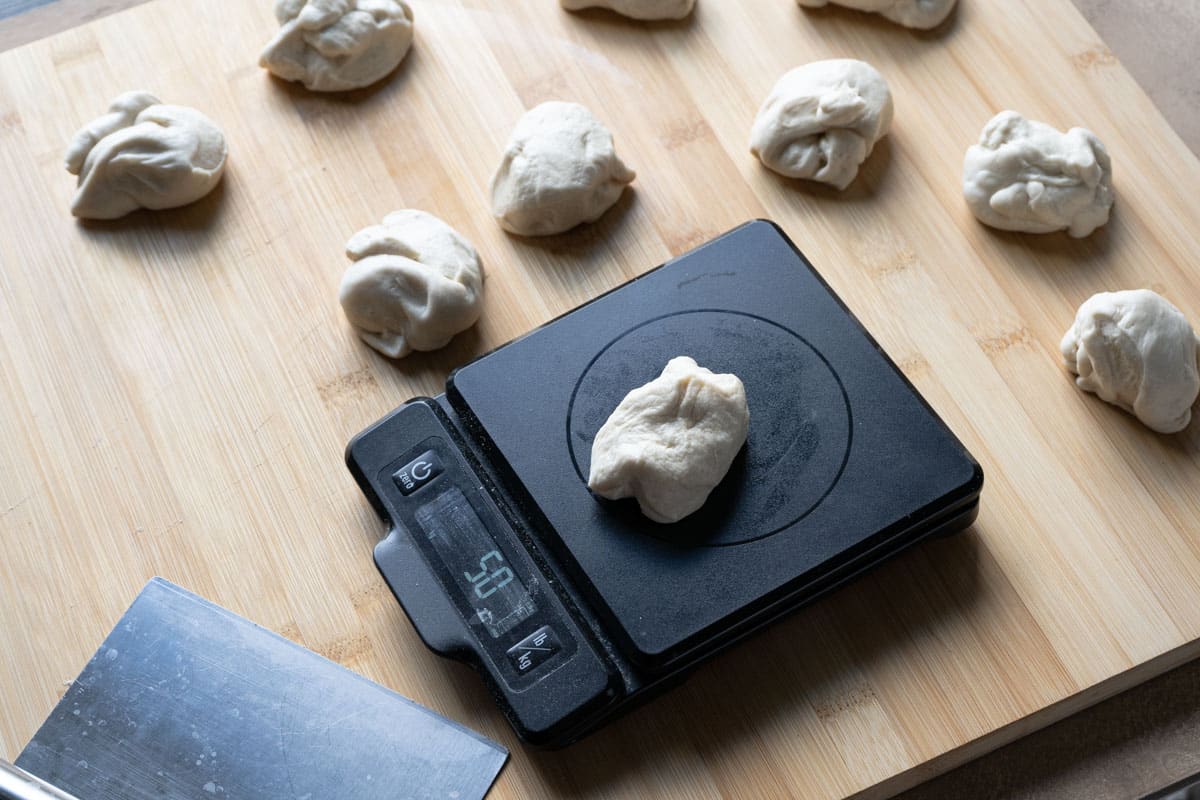
Transfer the dough onto a working surface and cut it into 10 even pieces, about 50g each.
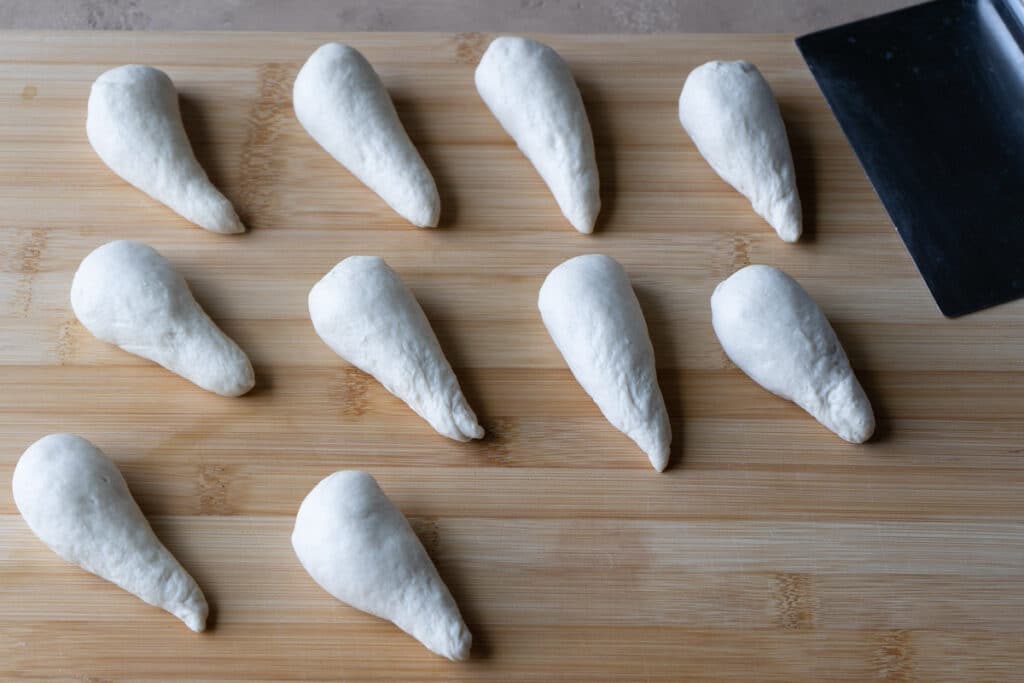
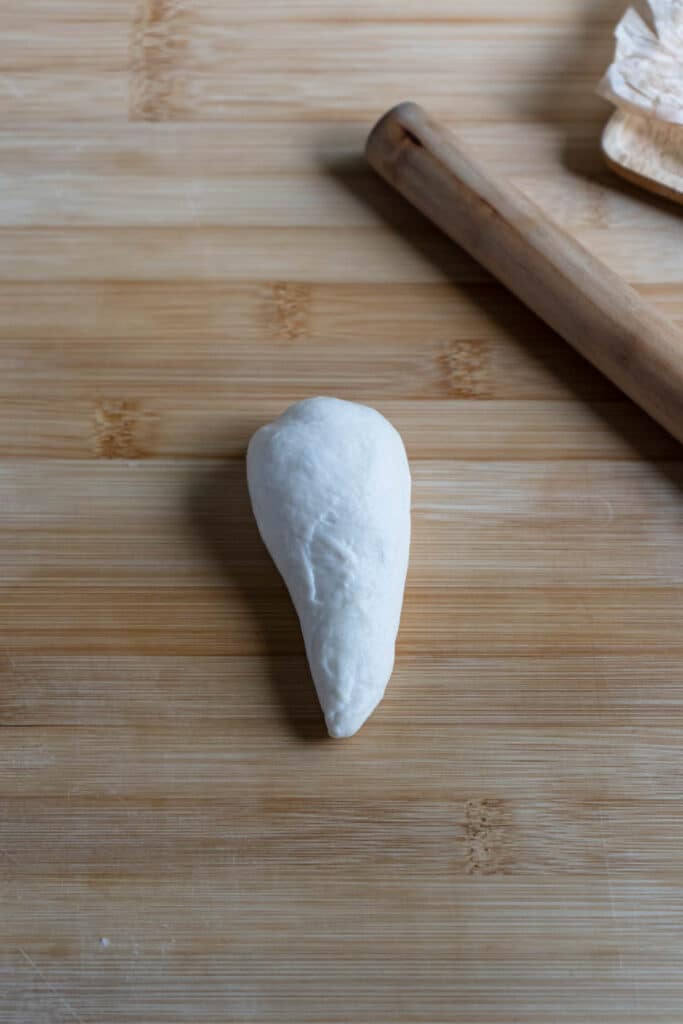
Press the dough down into a rough disk shape before folding the edge closer to you over the rest of the dough (reference the video above). Rotate 90 degrees and fold the closer part of the dough over the rest of the dough again. Then repeat this rotate and fold step two more times before before rolling one side of the dough thinner with your hand to form a cone shape.
Cover and let the dough rest for 15 minutes.
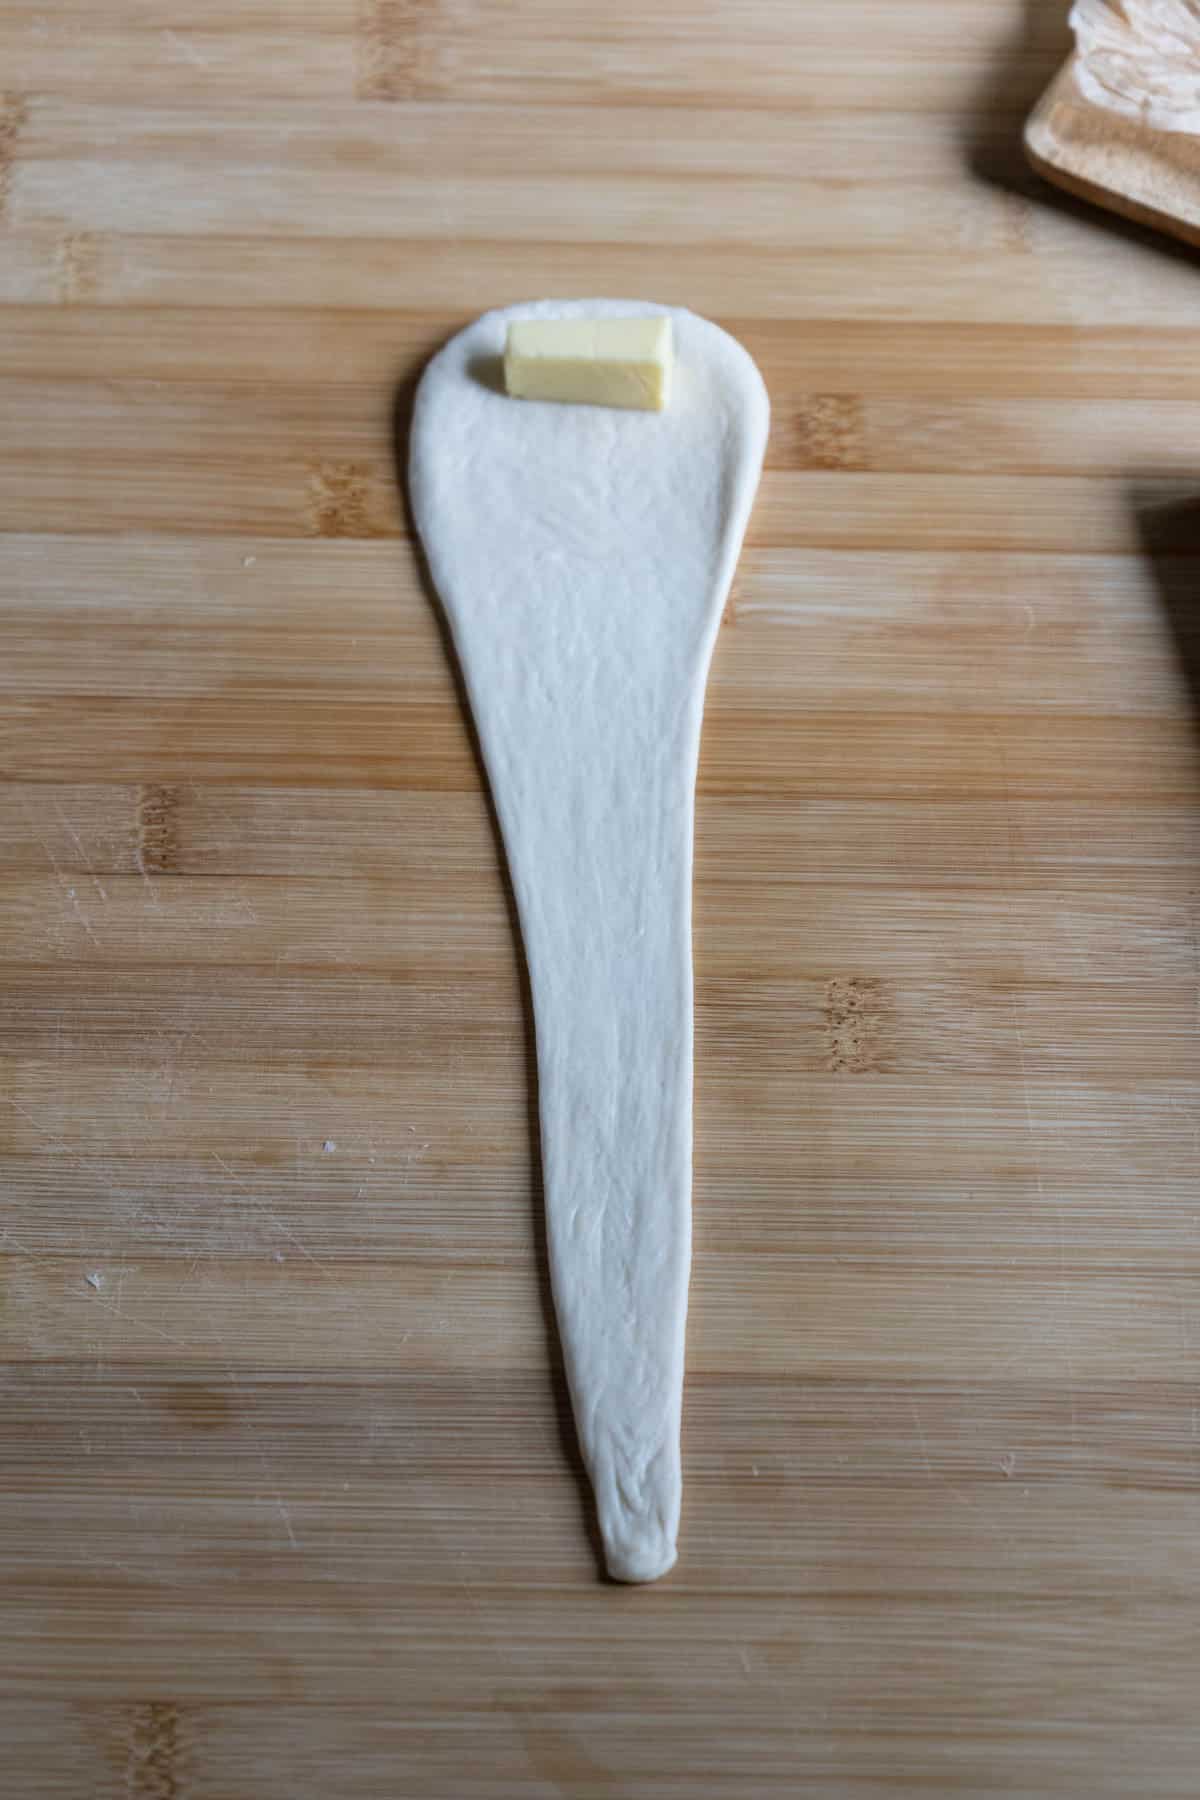
Take one piece of dough and roll it out flat into a long triangle, flip it over and continue to roll until it's about 3" (7cm) wide on the top and 14" (35cm) long.
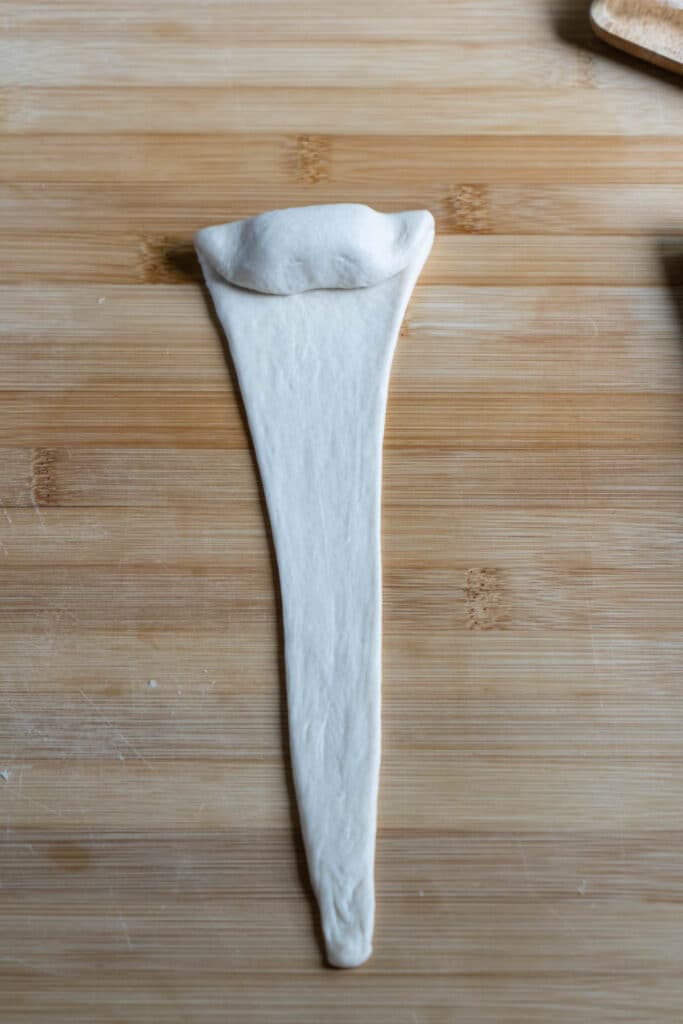
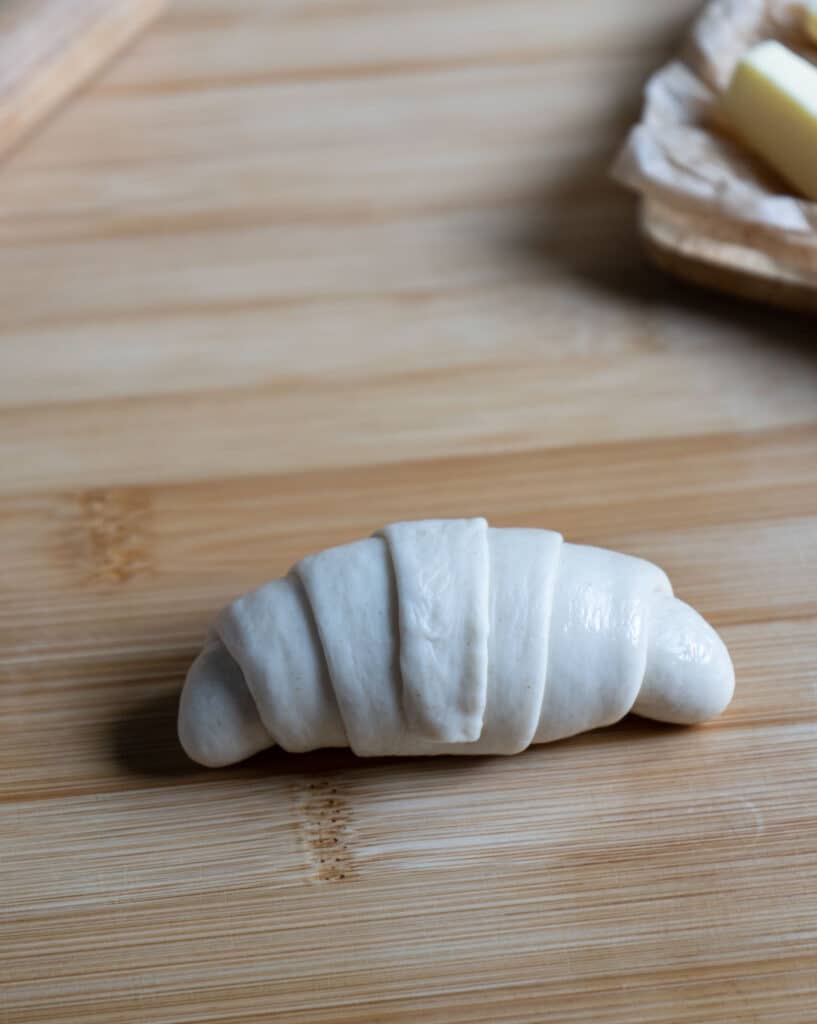
Place one piece of salted butter on the wide part of the dough, fold the top part of the dough down over the butter and lightly press down to seal the butter. Gently roll the top part all the way down to make it look like a croissant.
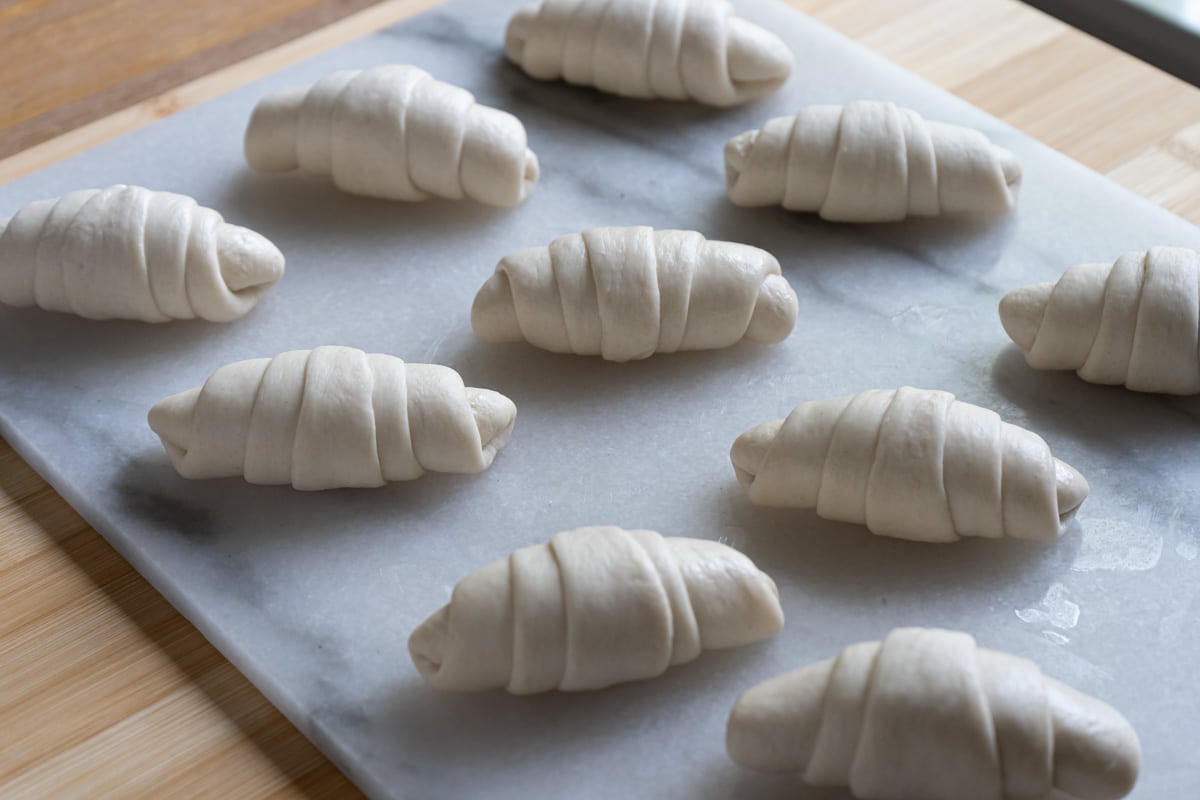
Repeat the same for the rest of the dough.
Step 5 - Final proof and bake.
Place the shio pan on a baking sheet lined with parchment paper or spray with baking spray, cover with damp towel and proof at 80-85°F (27-30°C) for 30 minutes.

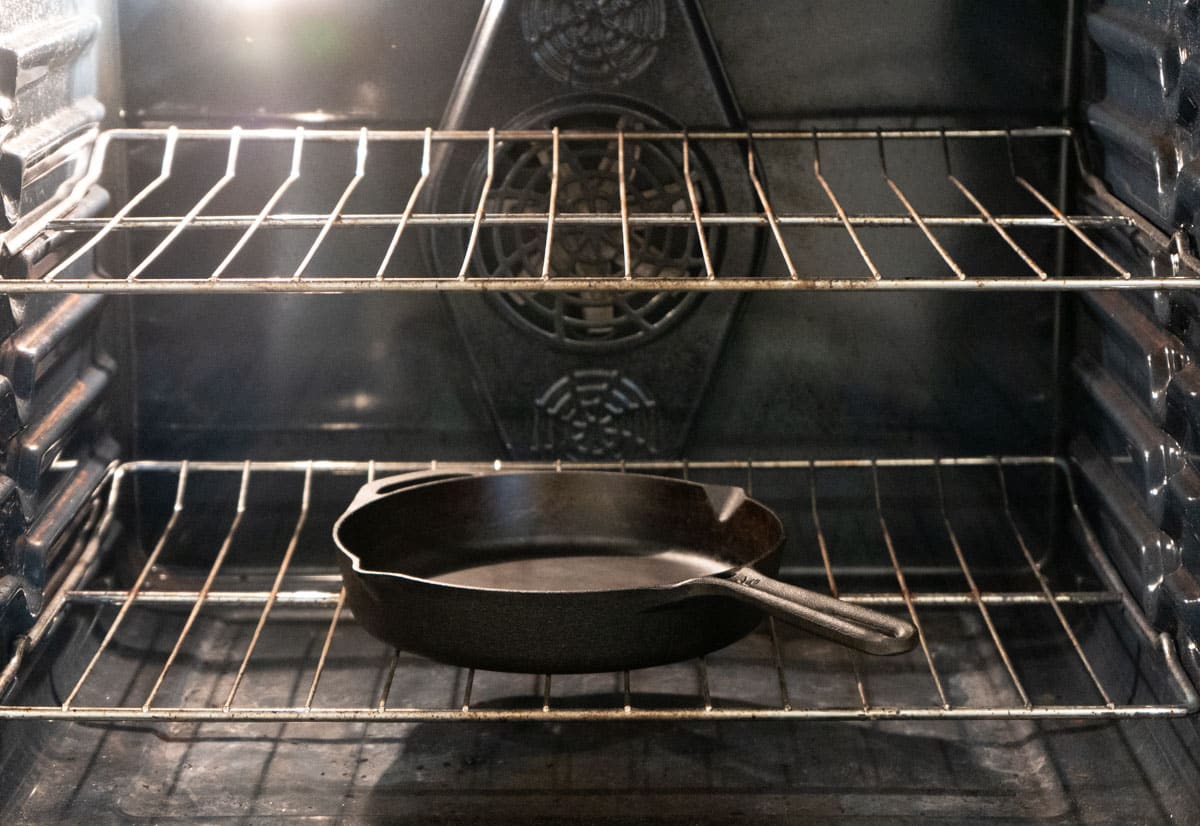
Meanwhile, adjust the oven racks so that one rack is on the lowest level while the other rack is one level up from the middle. Place a cast iron pan or baking tray on the bottom rack (in a later step, we will pour water on the hot pan to produce steam while baking shio pan).
Preheat the oven to 450°F (230°C) in the last 15 minutes.
Once the bread is done proofing, brush water on the surface and sprinkle a pinch of flaky salt on top of each shio pan before placing them on the upper rack in the oven.
Pour a cup a water into the cast iron pan or baking tray in the bottom to produce steam and quickly close the oven door. Make sure you wear oven mitts and be careful of the hot steam.
Bake for 13-14 minutes or until golden brown.

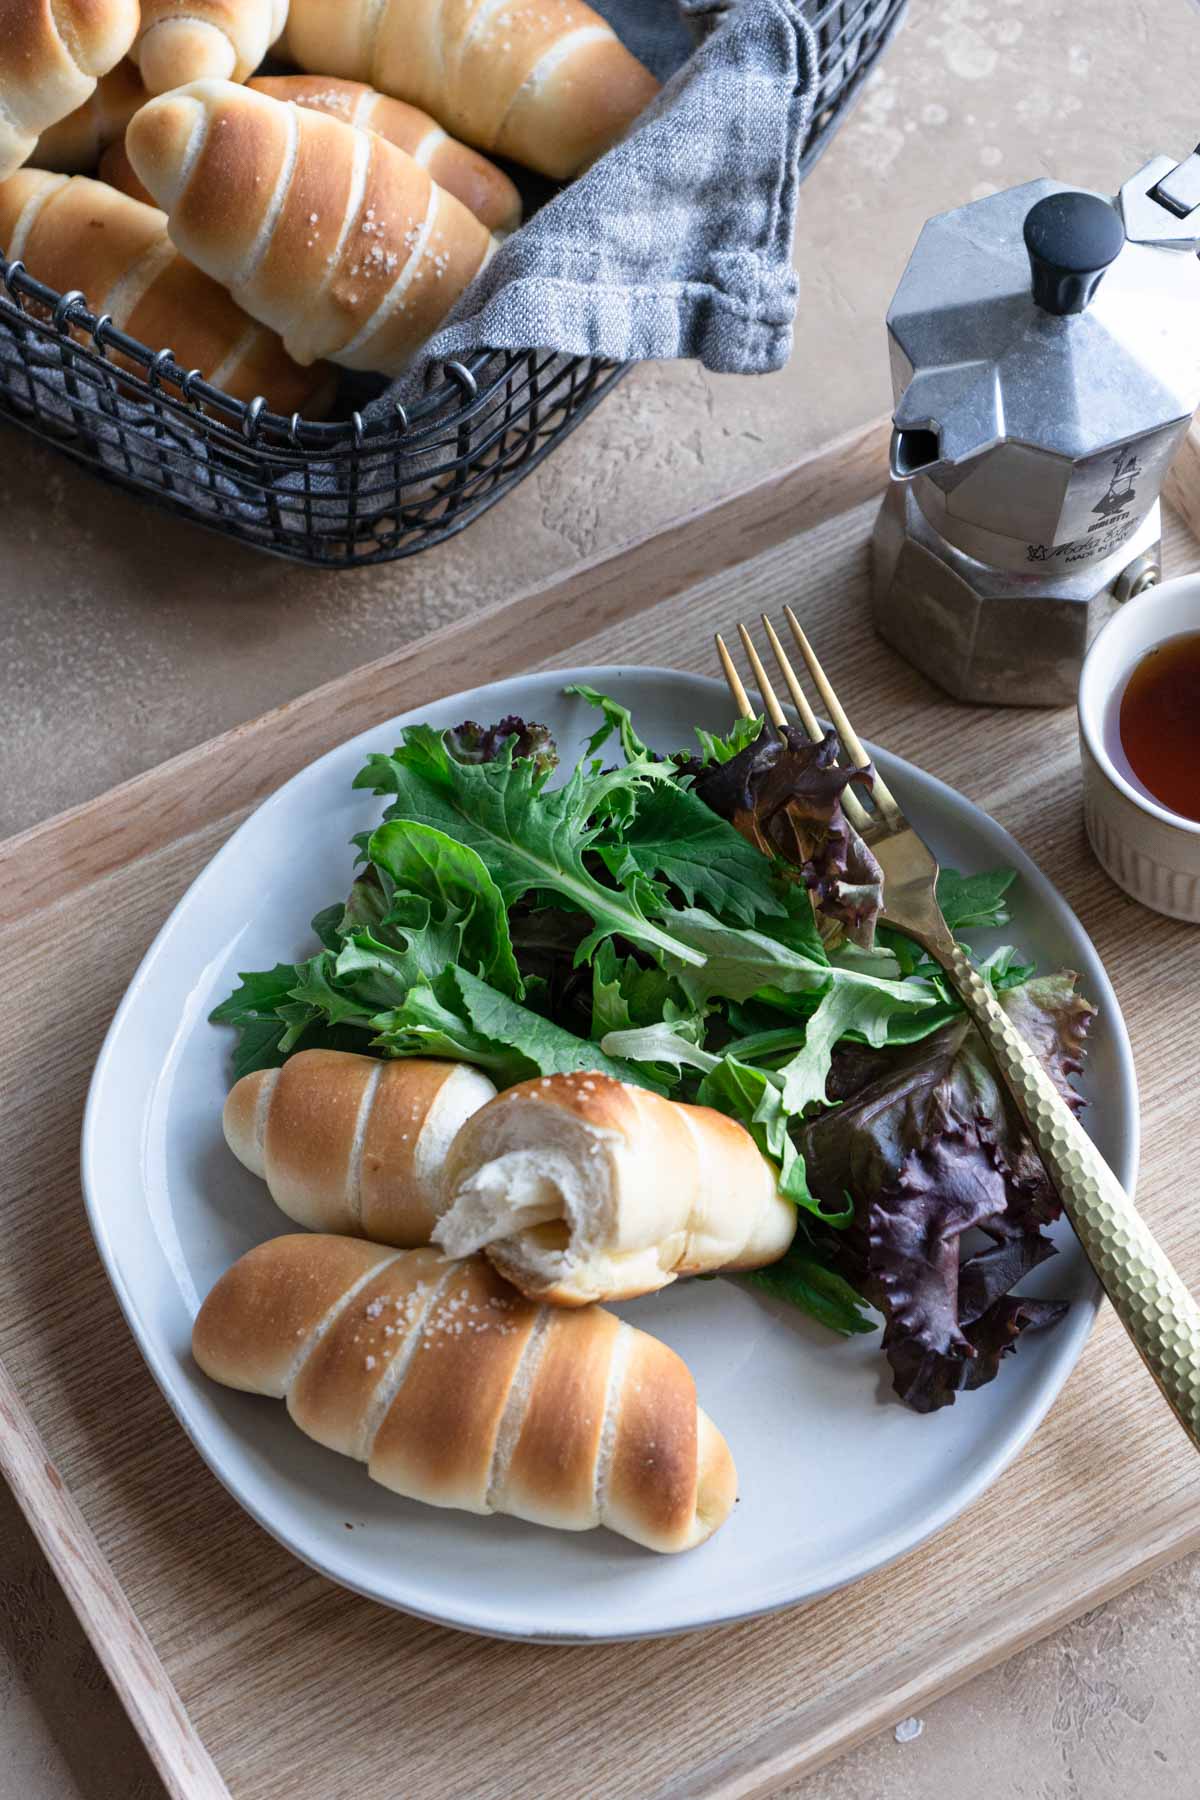
Take the tray out of the oven, let the bread cool down a little and enjoy while they're warm. They taste the best when they are freshly baked!
If you want to try more delicious Asian style breads, make sure you check out my tuna bun with corn and mozzarella cheese and Taiwanese milk butter buns.
Happy baking!!
Recipe Tips and Tricks
- Make sure you weigh all the ingredients with a kitchen scale.
- When shaping shio pans, try working fast so there won't be too much difference in terms of proofing time between the first and the last one.
- If you are new to making bread and need more time, store the first few rolls in the fridge (covered with damp towel) to slow down the proofing process. Take them out to do the final proof with all other rolls once they are all assembled.
- The rolls should look puffy after the final proof. To check if the rolls are proofed enough, dip your finger with water and gently press the surface of the bread, if it bounces back yet leaves a light dent, then you know it's done proofing. Over proved bread will be tasteless and under proofed bread will be dense.
- If you prefer a crispier crust on the surface, omit the 10g of butter in the dough mixture. However, the texture of the bread will be a bit less soft and fluffy.
Recipe FAQs
I haven't tried it yet but I'm sure you can. Check out this article from Cook Illustrated for how to substitute plain yogurt with Greek yogurt.
The windowpane test is a simple way to check if the dough has been kneaded enough. To perform this test, simply get a small piece of dough and stretch it carefully to see if it can be stretched into a smooth and almost see-through membrane. I usually do this test once the surface of the dough is very smooth from kneading.
Yes you can, you just won't get the thin crust on the surface. If you don't have a cast iron pan or any tray to use for creating steam, you can also throw a cup of ice on the bottom of the oven instead and do it again after baking 5 minutes.
Shio pan tastes the best when it's fresh, but if you would like to save some for later, place them in a zipper bag, squeeze out the air and store at room temperature for one day or in the freezer for a month.
Bake it at 350°F (180°C) for about 3-5 minutes or until warm. For the frozen ones, let it thaw for 30 minutes or so before baking.
Don't Forget to Try


I would like to hear from you! If you make this recipe, please consider leaving a star rating and comment in the section further down the page. Stay in touch by following my Instagram and Pinterest!
Shio pan 塩パン (Japanese sea salt butter rolls)
Equipment
- cooking spray
- parchment paper
- pastry brush
Ingredients
Over Night Sponge Dough
- 100 g warm water (around 105°F/40°C)
- ¾ tsp instant yeast, I used SAF instant yeast
- 45 g plain yogurt
- 150 g bread flour
Shio Pan Dough
- all the sponge dough
- 80 g bread flour
- 70 g cake flour
- 40 g cold water
- 20 g sugar
- 10 g unsalted butter, soften
- 6 g sea salt
Other Ingredients
- 50 g salted butter, European butter is recommended.
- flaky/coarse sea salt , I use fleur de sel
Instructions
Make sponge dough the day before.
- Mix instant yeast with warm water before stirring in yogurt and bread flour. Stir in the same direction for about 30 seconds until it's well combined.
- Cover the bowl with plastic wrap and let it sit on the counter for about 40 minutes to an hour before storing in the fridge overnight.
- The volume of the sponge starter should roughly triple by the next day. Make sure you use it within three days for the best result.
Make shio pan dough.
- Add all the dough ingredients except salt into a stand mixer, knead for 10 minutes on medium speed before adding salt and knead for another 10-15 minutes until the dough is smooth and passes the windowpane test.
- Take the dough out from the mixer, form it into a ball by folding the edges to the center and pinching together. The dough should be soft and fairly easy to handle.
- Put it seam side down in a lightly greased bowl, cover, and let it rise for 40 minutes to 1 hour in room temperature until the dough almost doubles in size.
Prepare salted butter
- While the dough is proofing, cut salted butter into 10 even pieces that's 5g with the dimension around 0.5(L) x 1.5(W) x 0.5(H) inches, which is about 1.25(L) x 3.5(W) x 1.25(H) cm. Store them in the freezer until it's ready to use.
Assemble shio pan (please see the video for instructions)
- Transfer the dough onto a working surface and cut it into 10 even pieces, about 50g each.
- Press the dough down into a rough disk shape before folding the edge closer to you over the rest of the dough. Rotate 90 degrees and fold the closer part of the dough over the rest of the dough again. Then repeat this rotate and fold step two more times before before rolling one side of the dough thinner with your hand to form a cone shape.
- Cover with a damp towel and let the dough rest for 15 minutes.
- Take one piece of dough and roll it out flat into a long triangle, flip it over and continue to roll until it's about 3" (7cm) wide on the top and 14" (35cm) long.
- Place one piece of salted butter on the wide part of the dough, fold the top part of the dough down over the butter and lightly press down to seal the butter. Gently roll the top part all the way down to make it look like a croissant. Repeat the same for the rest of the dough.
Final proof and bake.
- Place the shio pan on a baking sheet lined with parchment paper or spray with baking spray, cover with damp towel and proof at 80-85°F (27-30°C) for 30 minutes.
- Meanwhile, adjust the oven racks so that one rack is on the lowest level while the other rack is one level up from the middle. Place a cast iron pan or baking tray on the bottom rack (in a later step, we will pour water on the hot pan to produce steam while baking shio pan).
- Preheat the oven to 450°F (230°C) in the last 15 minutes.
- Once the bread is done proofing, brush water on the surface and sprinkle a pinch of flaky salt on top of each shio pan before placing them on the upper rack in the oven.
- Pour a cup a water into the cast iron pan or baking tray in the bottom to produce steam and quickly close the oven door. Make sure you wear oven mitts and be careful of the hot steam. Bake for 13-14 minutes or until golden brown.
- Take the tray out of the oven, let the bread cool down a little and enjoy while they're warm. They taste the best when they are freshly baked!
Video
Notes
- Make sure you weigh all the ingredients with a kitchen scale.
- When shaping shio pans, try working fast so there won't be too much difference in terms of proofing time between the first and the last one.
- If you are new to making bread and need more time, store the first few rolls in the fridge (covered with damp towel) to slow down the proofing process. Take them out to do the final proof with all other rolls once they are all assembled.
- The rolls should look puffy after the final proof. To check if the rolls are proofed enough, dip your finger with water and gently press the surface of the bread, if it bounces back yet leaves a light dent, then you know it's done proofing. Over proved bread will be tasteless and under proofed bread will be dense.
- If you prefer a crispier crust on the surface, omit the 10g of butter in the dough mixture. However, the texture of the bread will be a bit less soft and fluffy.
- See the FAQs section in the post for more information.
Hi I am new learner on Bread making, found your recipe Shio pan, I read your recipe very detailed n video very clear explanation. I had made first try , is very nice . Need to try more to improve the shape rolling not as nice as your video.
I did’t use bread machine for all bread
I made at the time being.
Thank you very your sharing
Sylvia
Hi Sylvia, that's awesome! I'm glad to hear your shio pan turn out well. Making bread takes a lot of practice, I believe you will get better and better each time 🙂
Hi, could I keep the dough in frig, next day then shape and bake?
Thanks
Sylvia
Oh , my Shio pan after bake, too is brown , bottom yellow white and a bit oily. As I check Johan , they’re both size same color . I query need to turn after 6-7 mins?
It's normal that the bottom part is oily, in fact the buttery and crispy part is what makes the shio pan tasty!
Hi Sylvia, yes you can, just make sure you put the dough a sealed ziploc bag and squeeze out the air.
Hi Edwina. Do I put hot or cold water in the oven? Thanks. Greetings from Serbia
Hi Dragana, I usually just use cold water, since it's just one cup and the pan is hot enough to turn cold water into steam right away 🙂
Hi! I aim to making this bread in the near future but I'm a very visual learner and see that the video isn't available on the page. Would it be possible if you could reupload it please?
Hi Jen,
You can find the video in the recipe card, and it will play after a short commercial video. Happy baking!
One of recipes that works on first try! Thank you for making 150 shio pan to get it right so I don’t have to 😁
One of those recipes that works on the 1st try. Thank you for making 150 shio pans so that I don’t have to.
Hi Yuri, that's awesome! I'm glad to hear your shio pan turned out well 🙂
Hi! Can I check if you used Greek yogurt?
Yes, you can! I would probably add 1-2 teaspoon of water to the dough.
Hi, the Over Night Sponge Dough to be used straight from fridge or need to rest in room temperature for a while before add in all Shio Pan Dough ingredients?
Hi Cathy, you can use it straight from the fridge.
Hi! I'm making these for a party tonight and was wondering if I needed to let the sponge dough ferment overnight in the fridge or is it possible to just let it rest on the counter for a few hours?
Hi Alicia,
Yes, you can let the stater rest on the counter until it's double to triple in size. However, the flavor won't be as good as if you let it rest in the fridge overnight, though.
I loved this recipe! I was shocked that mine came out almost as good-looking as yours!
When I was traveling in Hokkaido, I came across shiopan with fried chicken baked inside. I have dreamed of that bread since, so I air-fried some pre-fried frozen chicken and placed it in the dough alongside the butter, and it came out amazing!
That's so awesome! I've never tried one with fried chicken, sounds very yummy 😀
hi
i tried your receipe once and it turned out alright. would like to know if the dough is to be kneaded till it is smooth and shiny? i found that the dough becomes sticky again after 5 min of kneading after adding salt
Hi Wan,
Good question! It's normal that the dough gets stickier after adding salt. You will need to knead more until the dough is smooth and pass the windowpane test.