

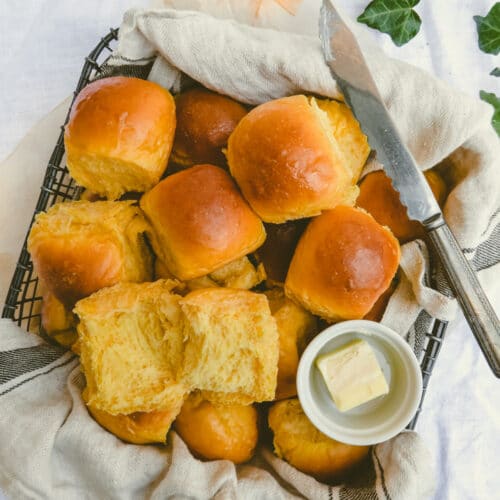
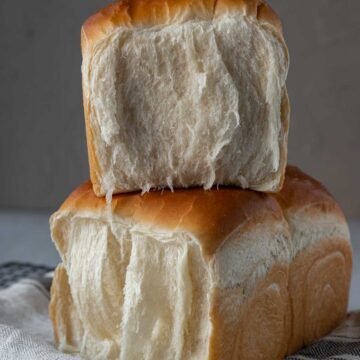
Freshly baked milk bread is irresistibly fluffy and delicious, and their aroma is amazing as well! This post guides you through the process of making milk bread with a dreamy texture without the tangzhong method.
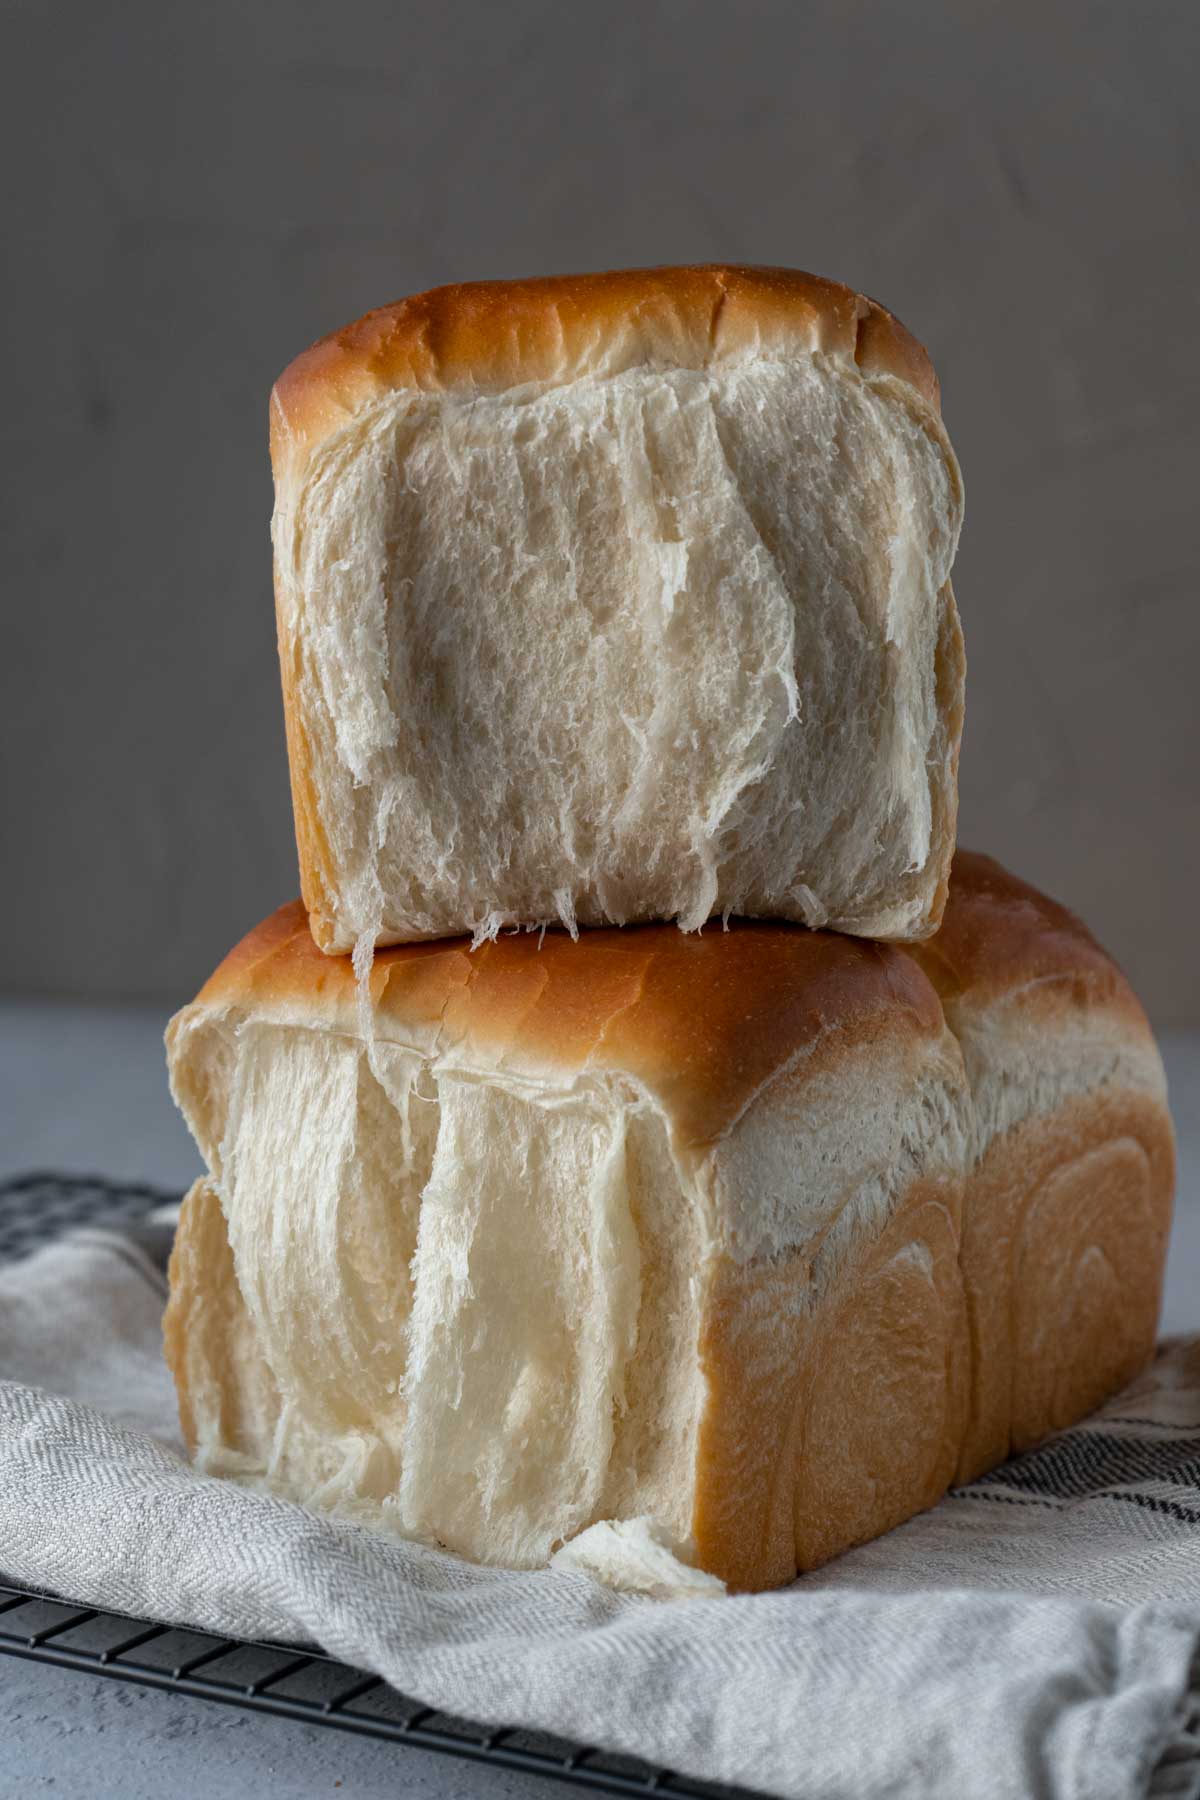
This recipe is adapted from Pao-Chun Wu, a renown baker from Taiwan who won the title of master baker in the 2010's Coupe Du Monde de la Boulangerie international baking competition. The flavor is simple with a hint of fragrance from the milk. These are soft and fluffy yet still providing a satisfying bite. This bread is great for sandwiches or just for snacking on by itself.
I've been making bread for over 6 years, it's one of my favorite things to do in the winter, and even more so on a snowy day. I can't say I'm a expert, but I do have a lot of experience and insight that I would like to share with you!
Why You Should Try This Recipe
- The original recipe is develop by a popular and renowned Taiwanese master baker.
- It's easier than other milk bread as you don't need to make a tangzhong dough/paste.
- I will show you my best tips for making great tasting Asian bread.
Ingredients You'll Need
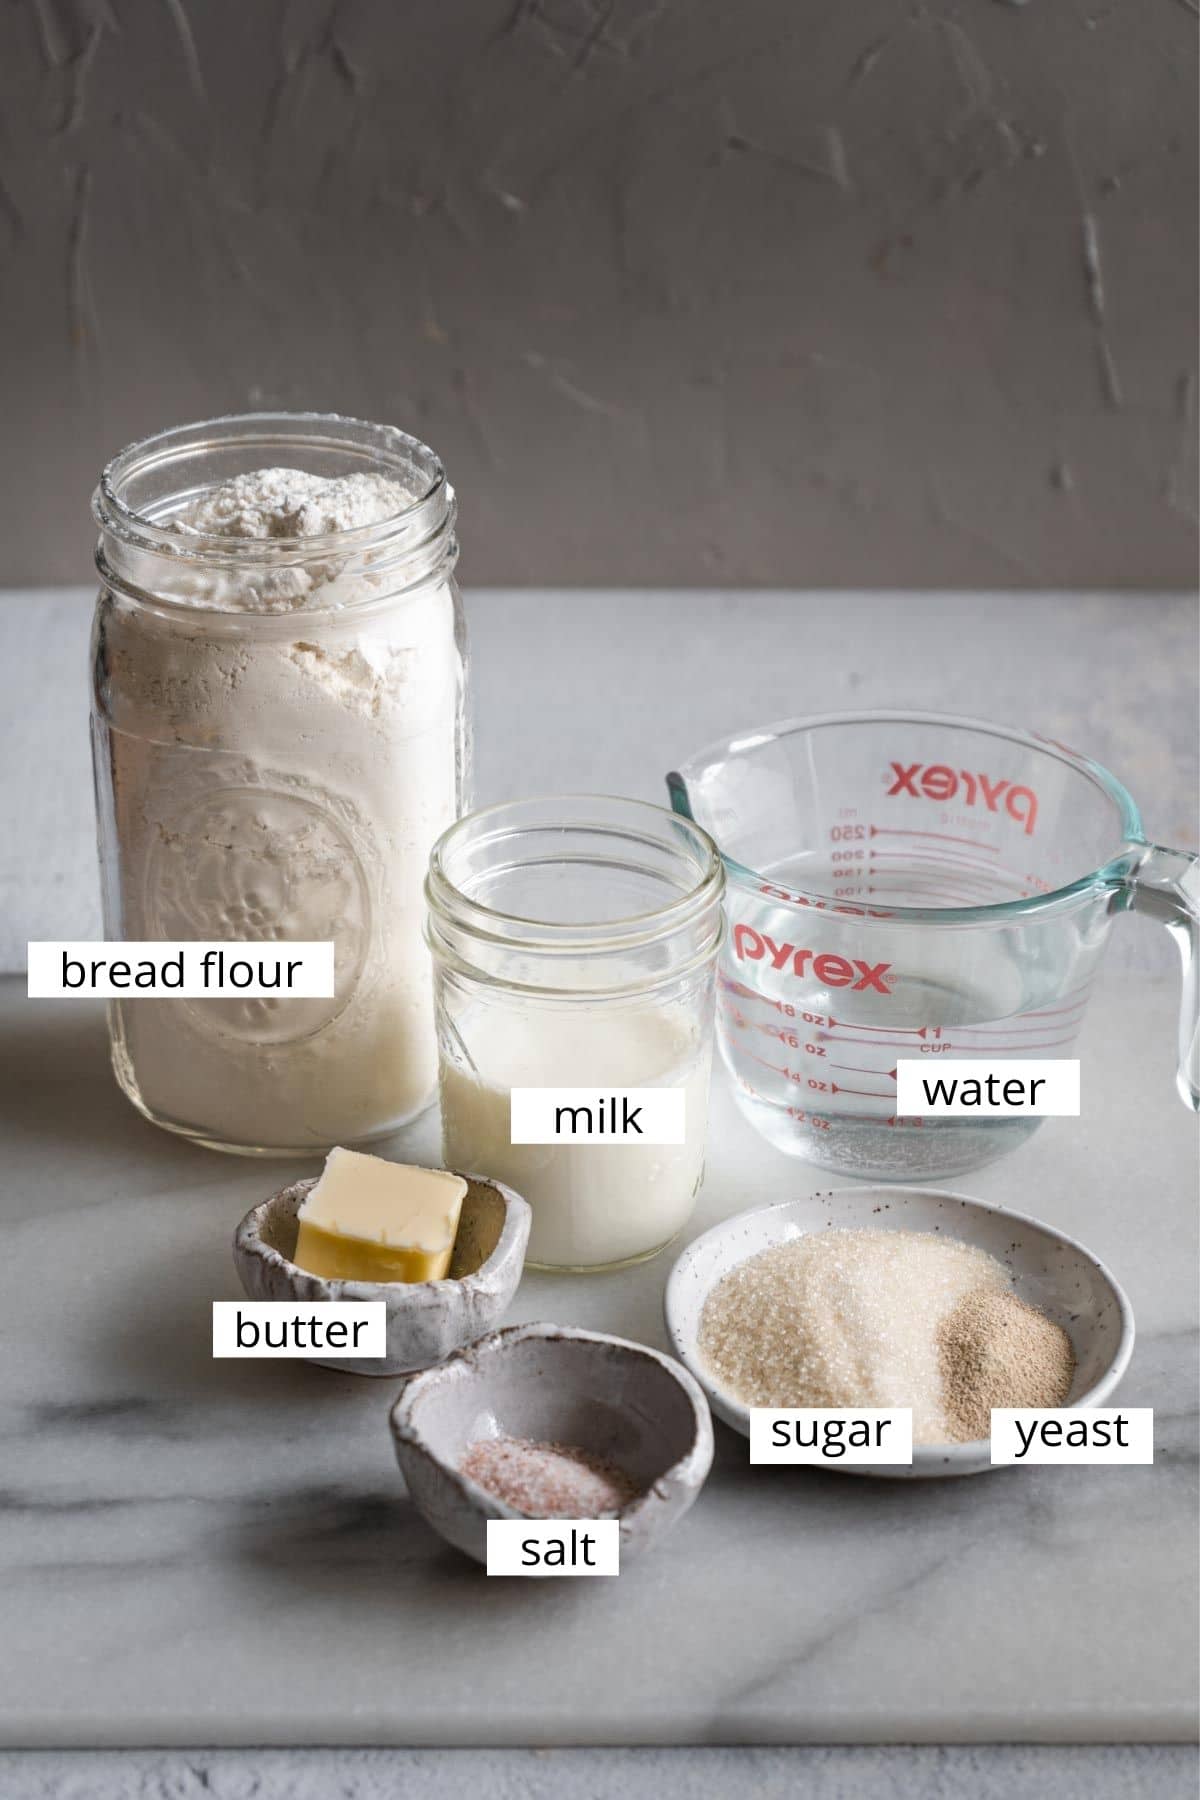
notes
- Yeast - I highly recommend using Saf instant yeast for making Asian breads, it's an easy way to improve the texture of your bread.
How to make this recipe?
Step 1 - Add bread flour, sugar, yeast, water and milk in a stand mixer, knead until a rough lump of dough is formed. Cover and let it rest for 30 minutes.
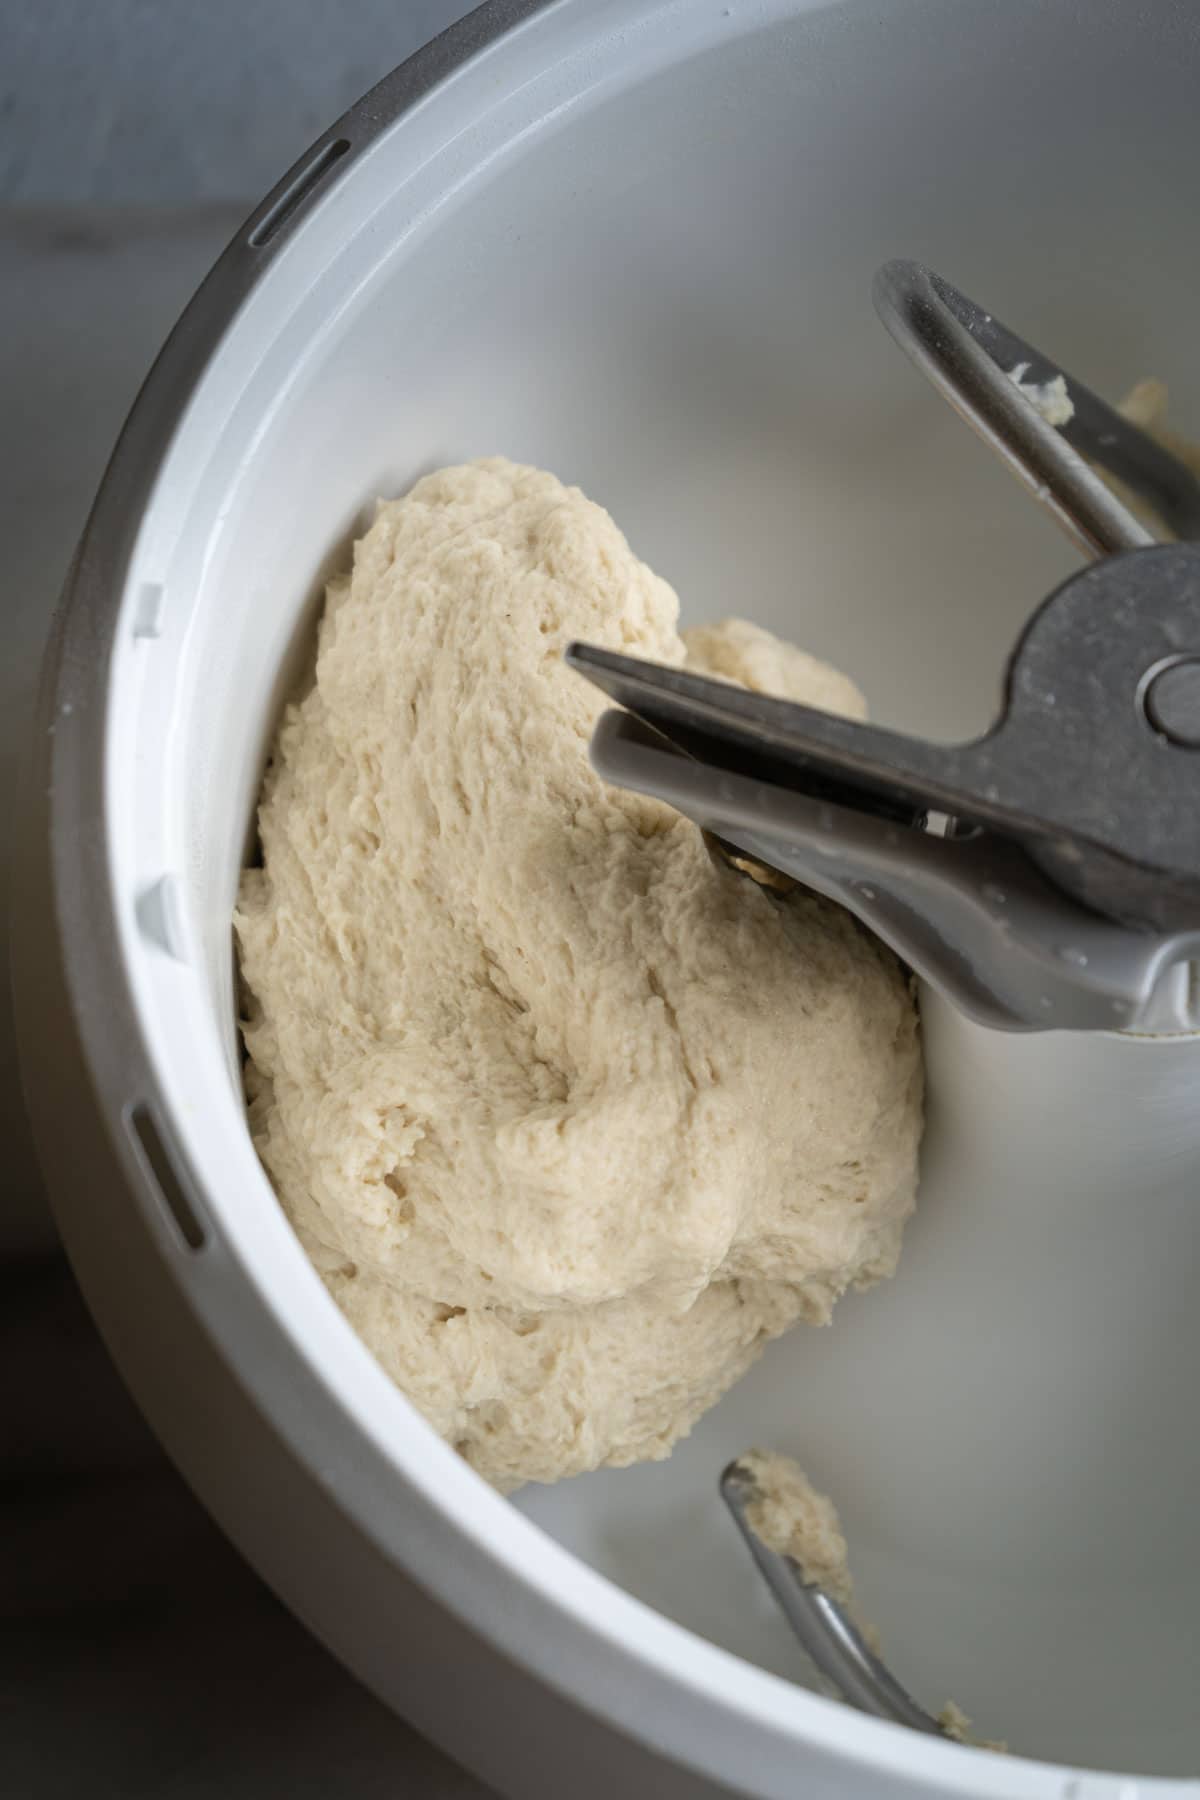
Step 2 - Add salt and knead for one minute before adding butter. Continue to knead until it passes windowpane test. This step usually takes me (I have a Bosch Universal Plus mixer) around 7 minutes (6 minutes on low and 1-2 minutes on medium), but the actual time will depend on your mixer.
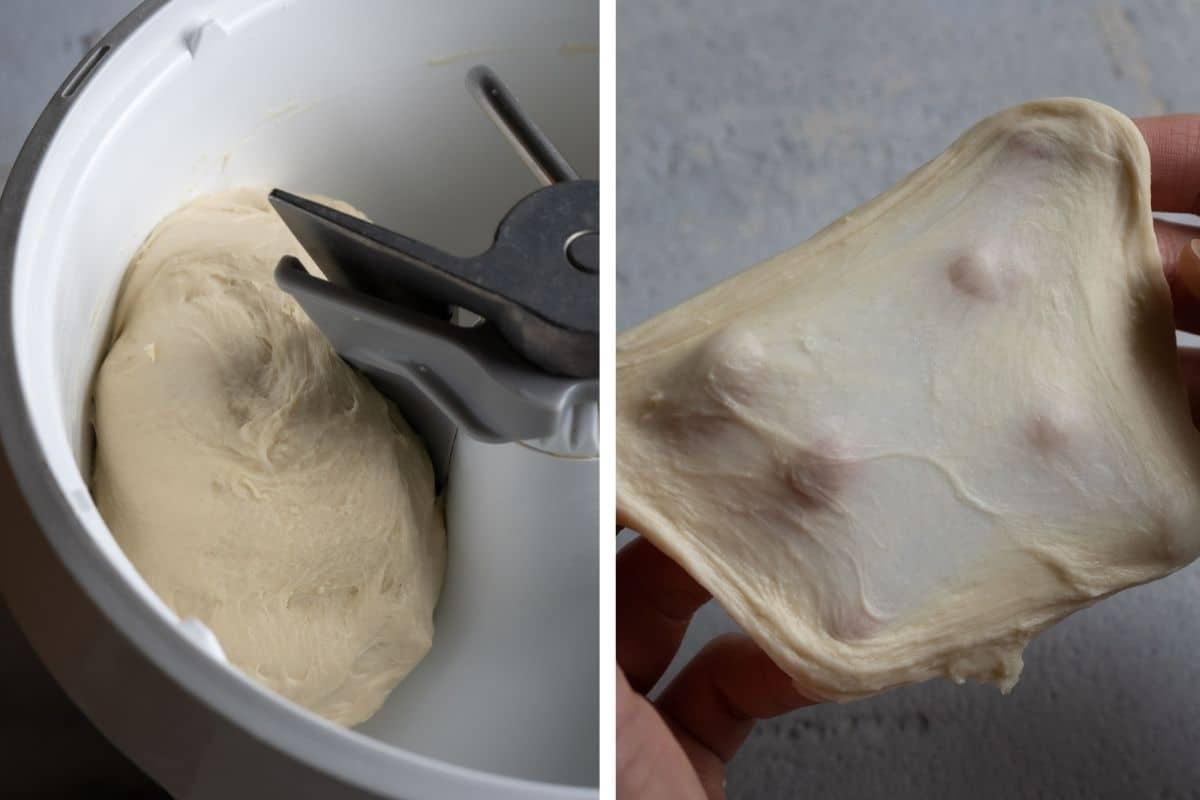
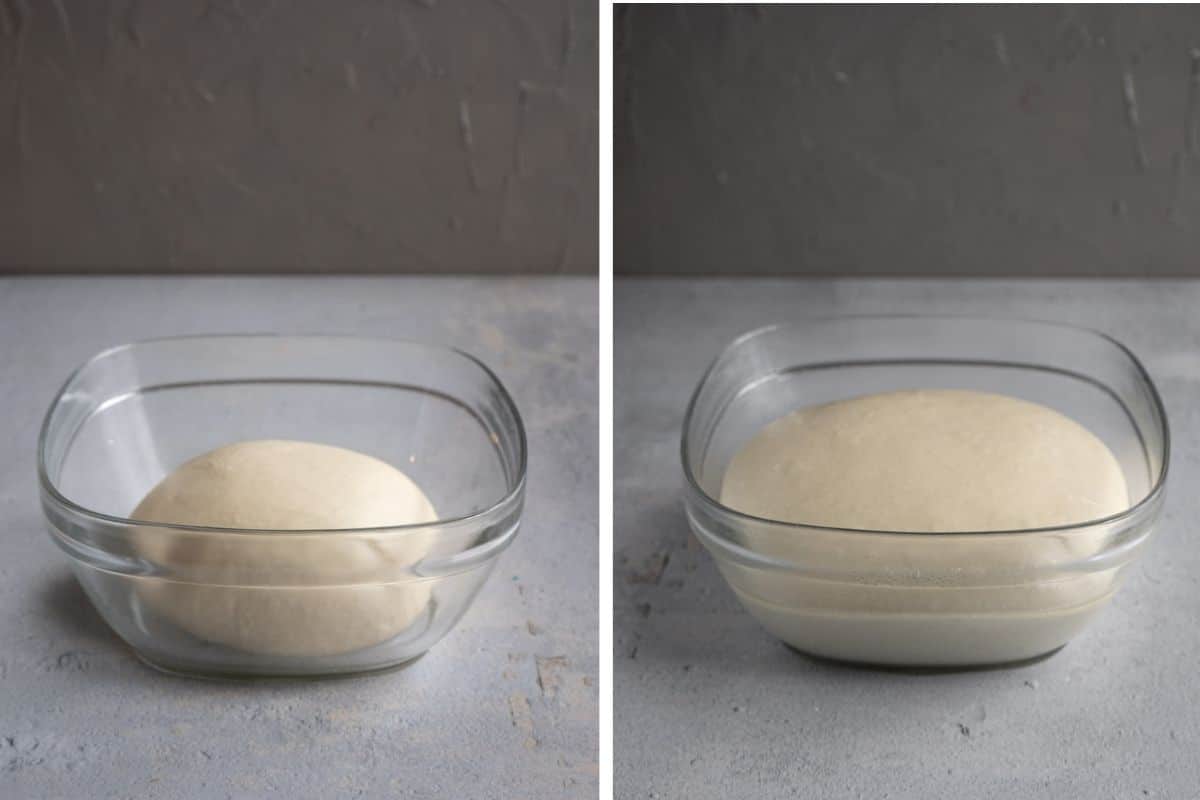
Step 3 - Form the dough in a ball by folding the edges down to the center and pinch them together. Place it in a greased bowl, cover and let it proof in a warm place for 1 hour or until it doubles in size.
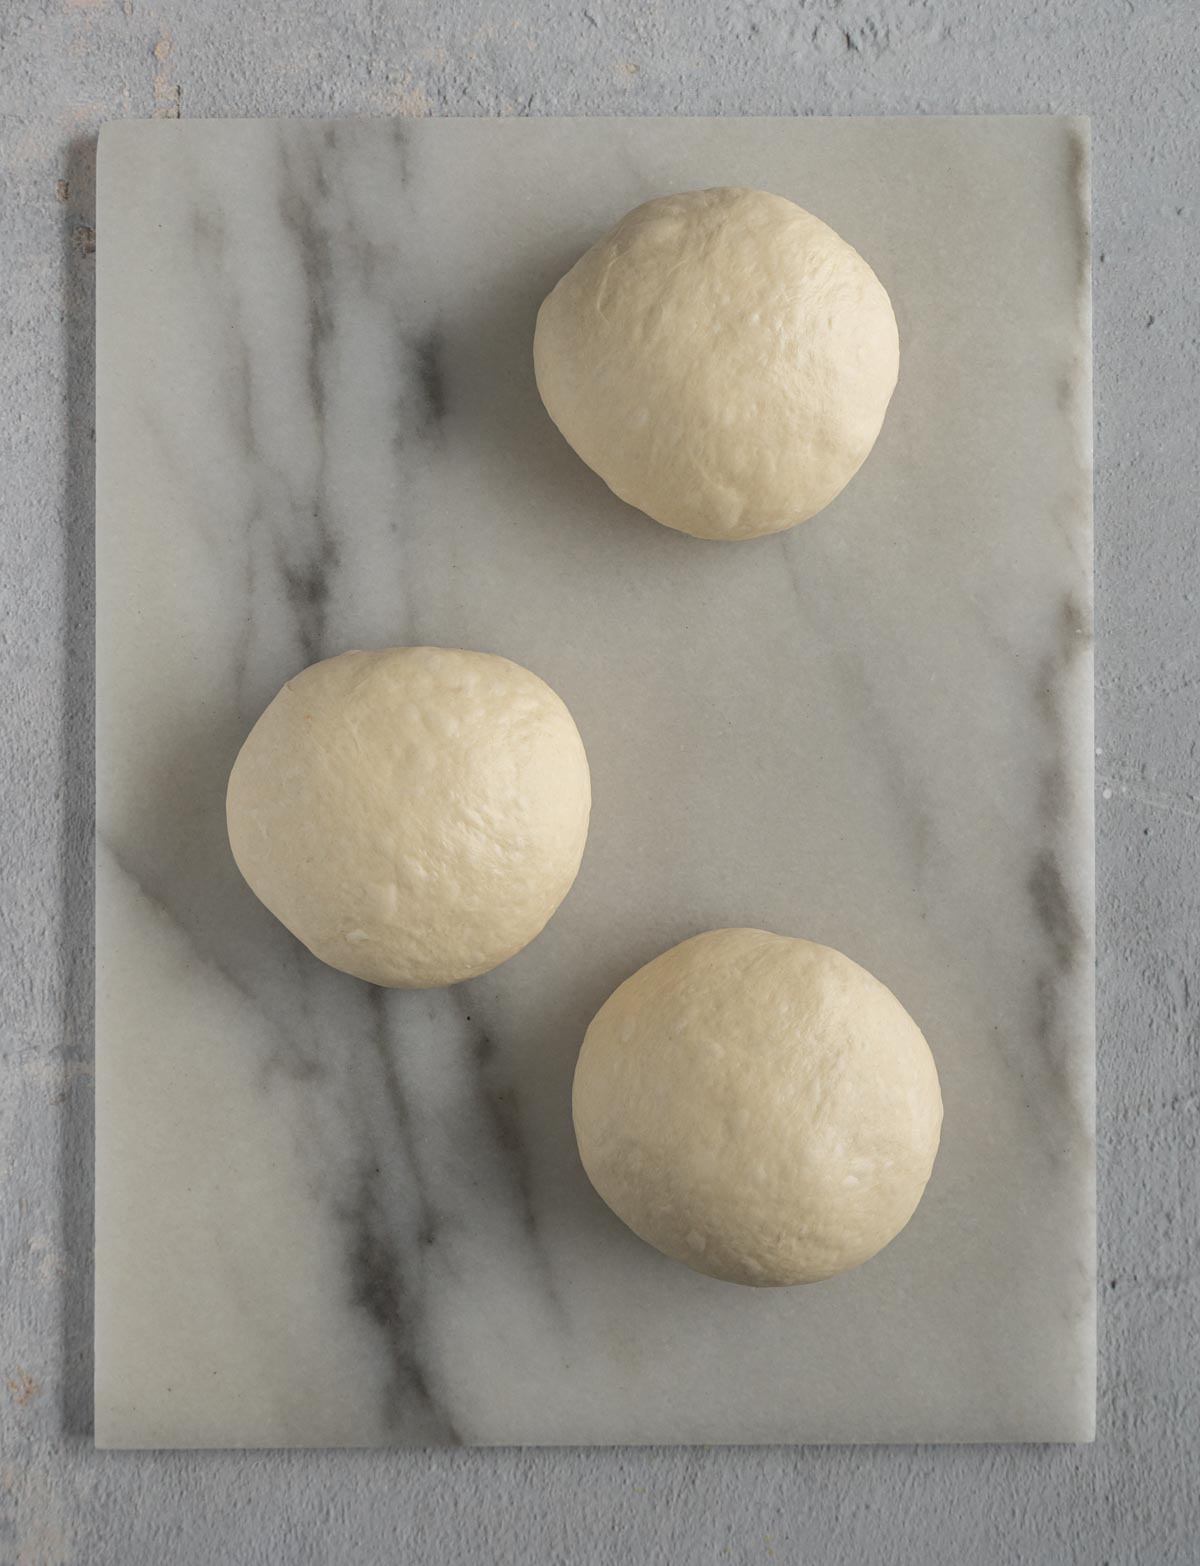
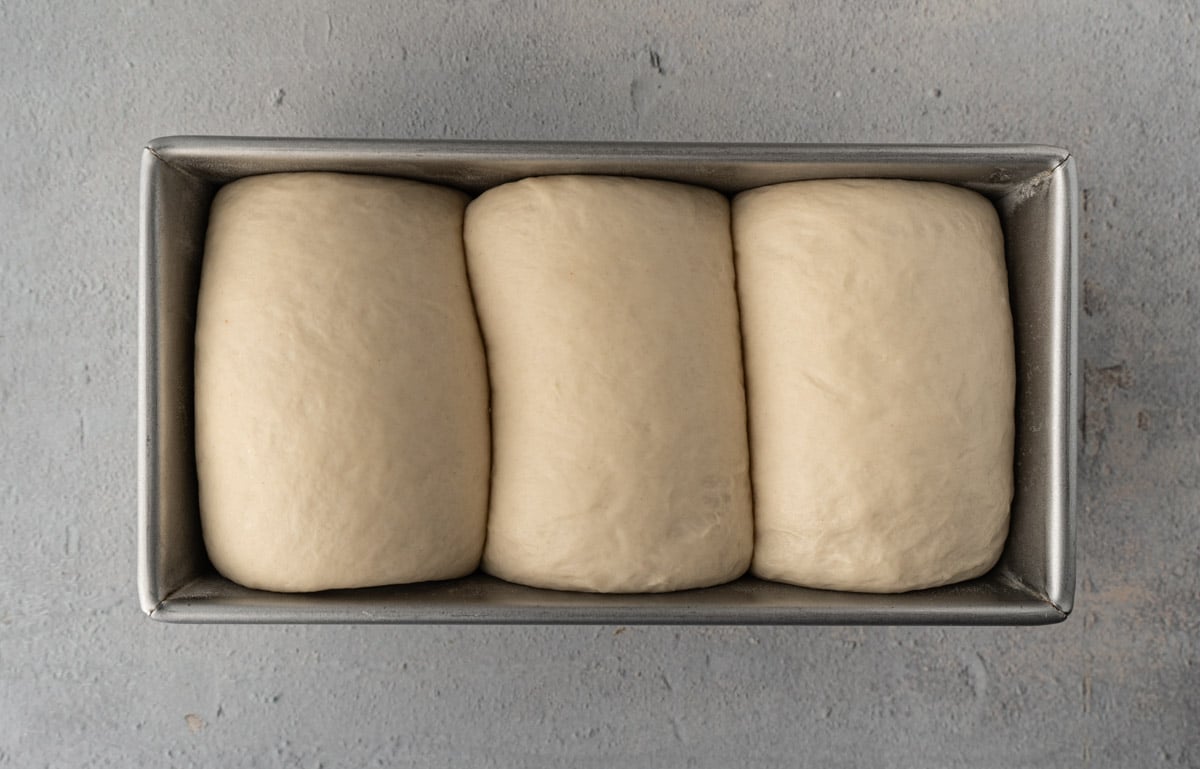
Step 4 - Transfer the dough onto a working surface and cut it (don't pull it apart with your hand) into 3 even pieces. Form each piece into a ball. Cover the dough balls with a damp dish towel or greased plastic wrap, allowing them to rest for 15 minutes.
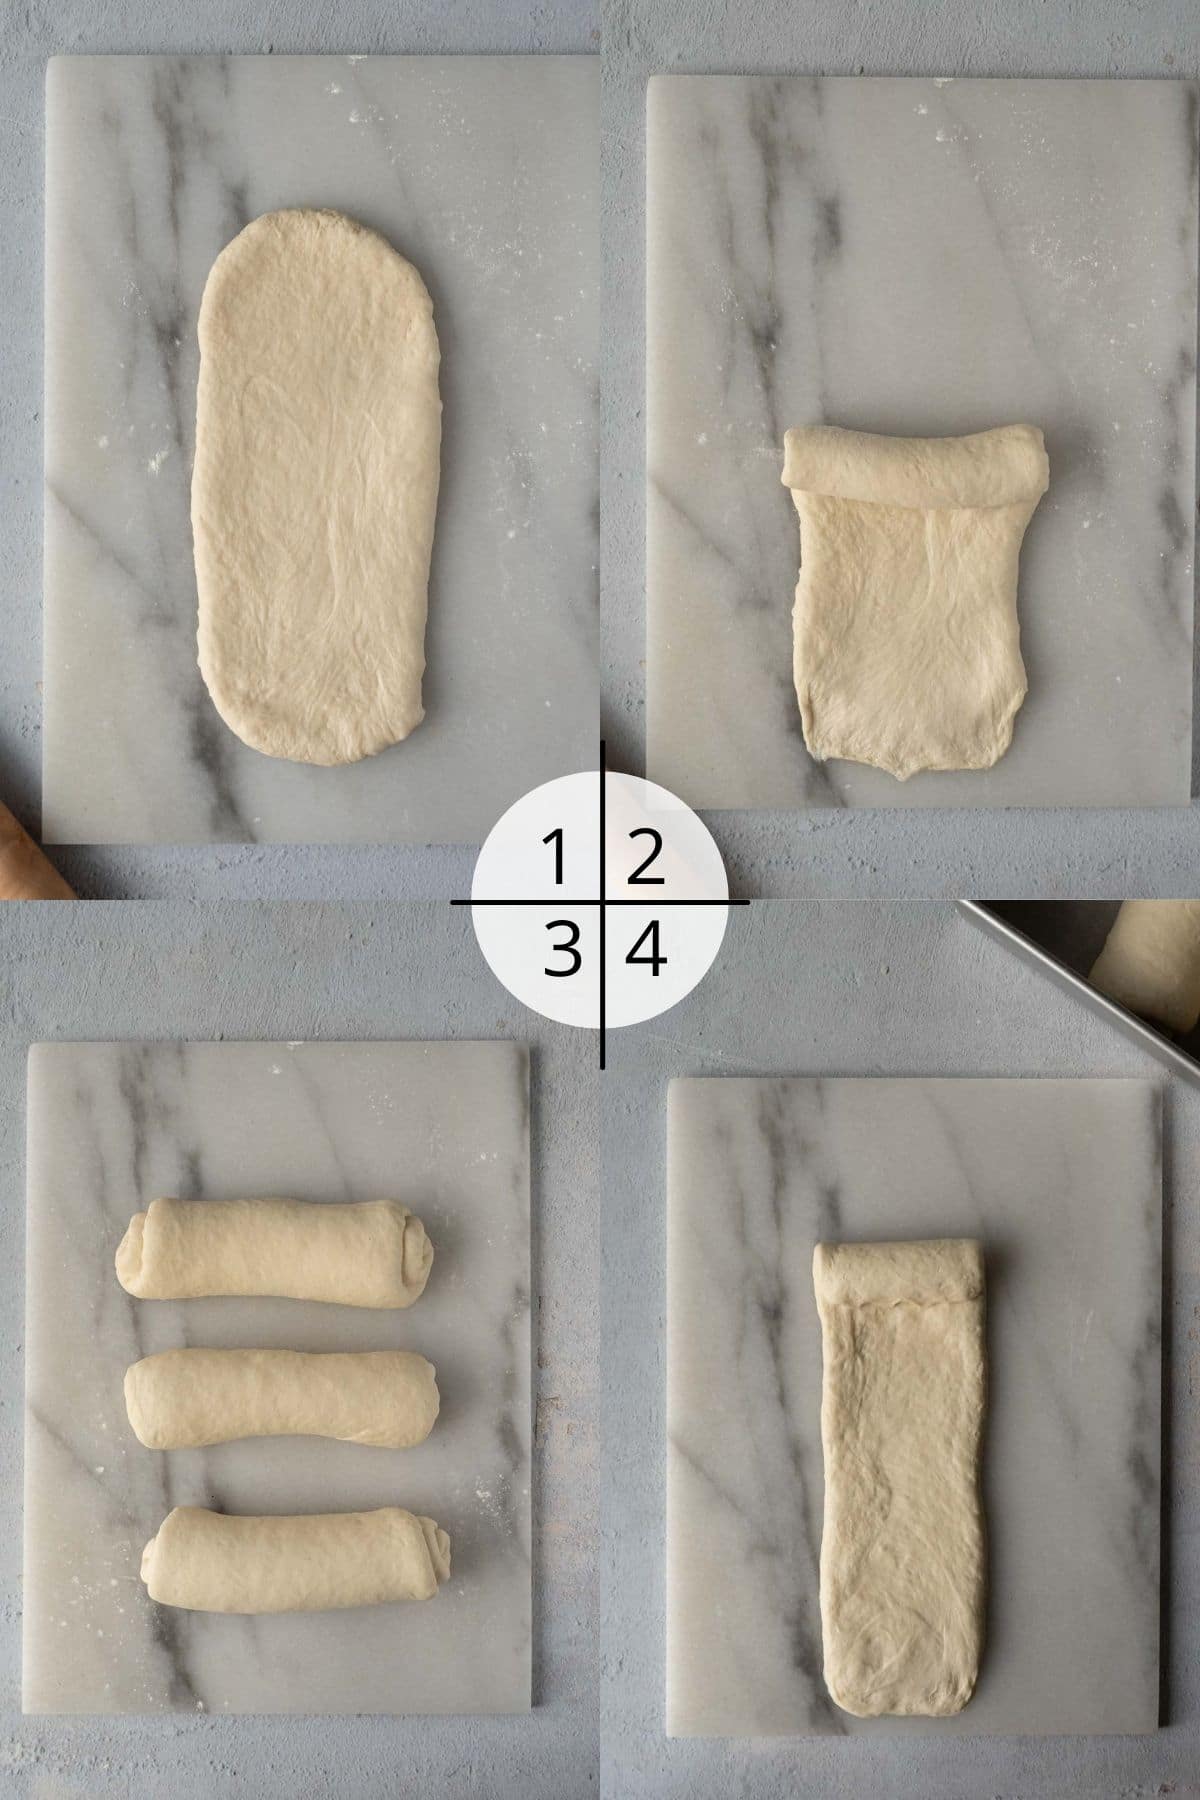
Step 5 - Roll the dough out to an oval shape and then roll it up into a log, do the same for the other two, cover and let it rest for 15 minutes and then repeat the same rolling process again.
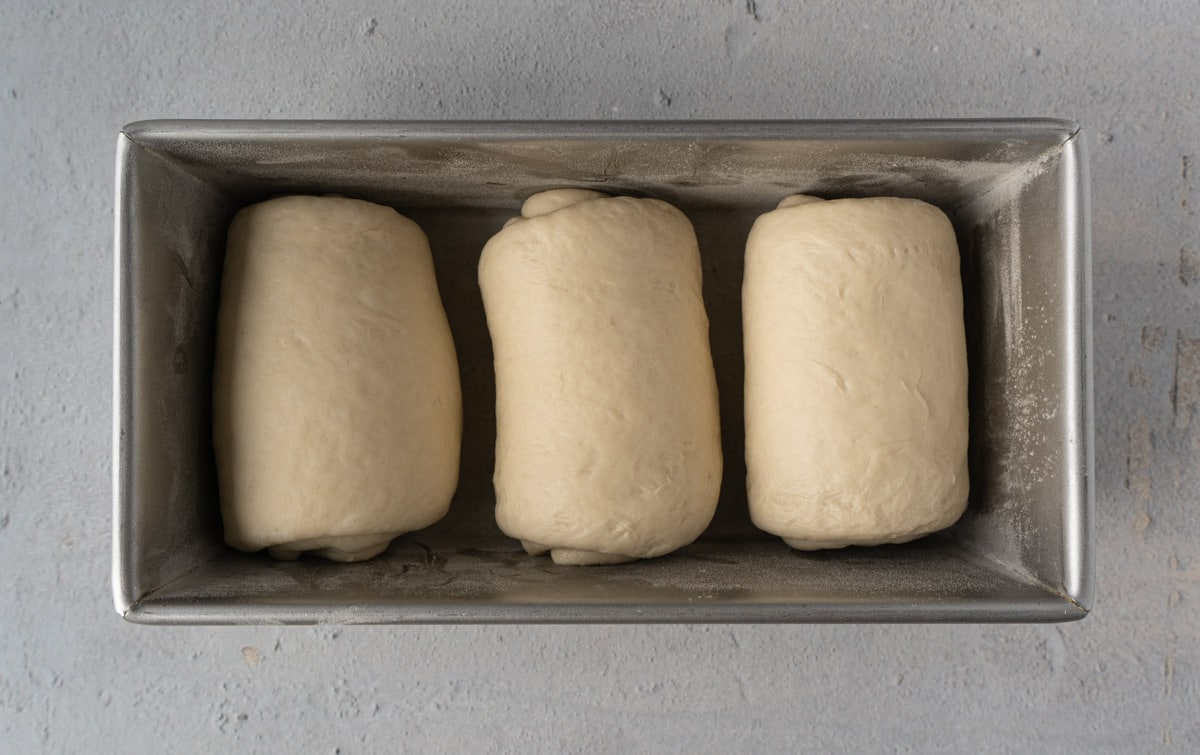
Step 6 - Place the rolled up dough in the loaf pan, cover with greased plastic wrap and proof in a warm place for 1 - 1.5 hour until the dough fills 80-90% of the loaf pan.
Step 7 - In the last 20 minutes of the proofing time, preheat the oven to 375°F and adjust the rack to the second slot from the bottom.
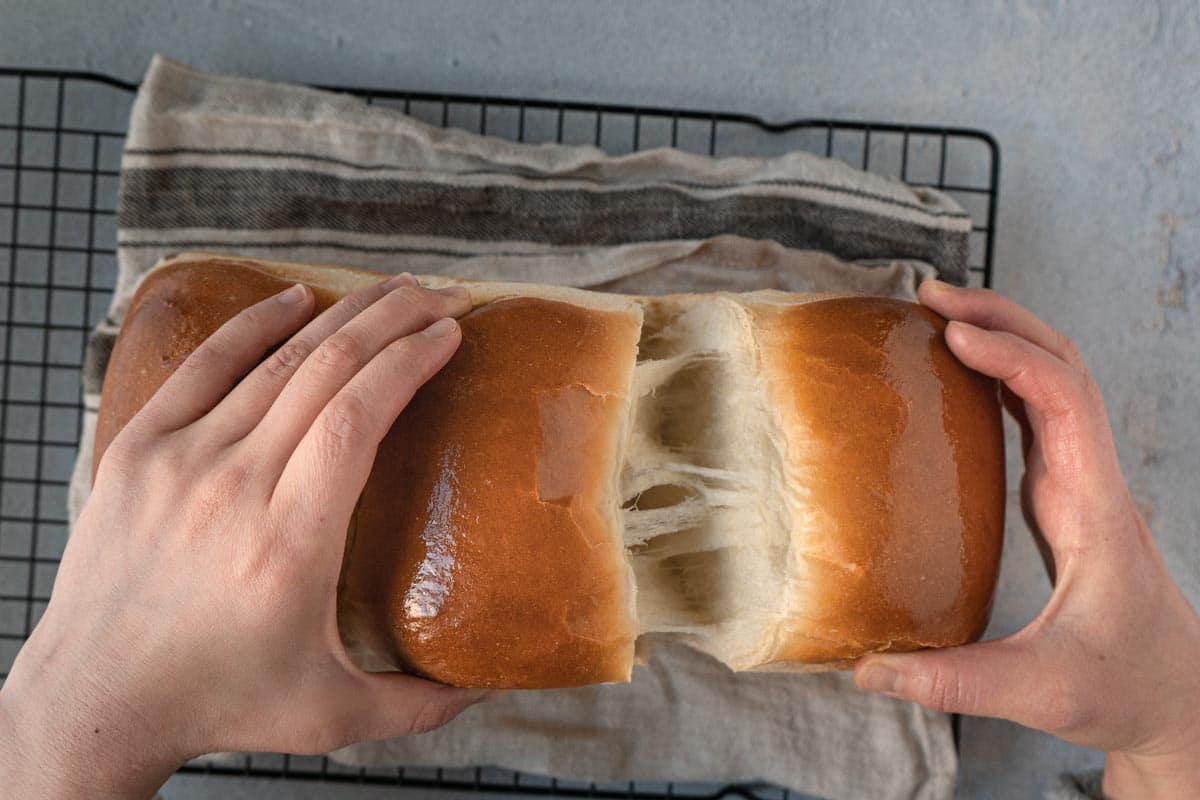
Bake it uncovered for 30-35 minutes. Loosely cover with a piece of foil after baking for 15 minutes to prevent the bread from becoming too dark.

When your bread is done baking, take it out of the pan right away, brush the top with melted butter and let it cool on a cooling rack for about 15 minutes before enjoying.
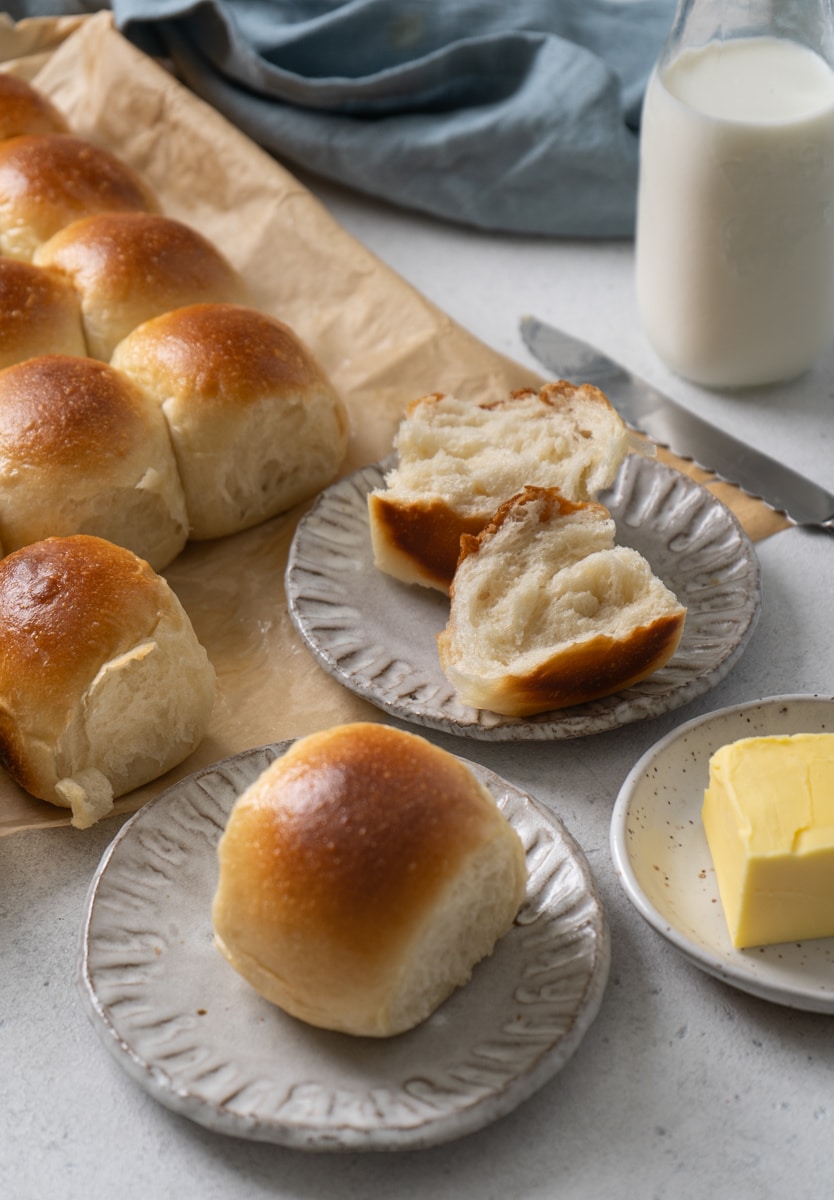
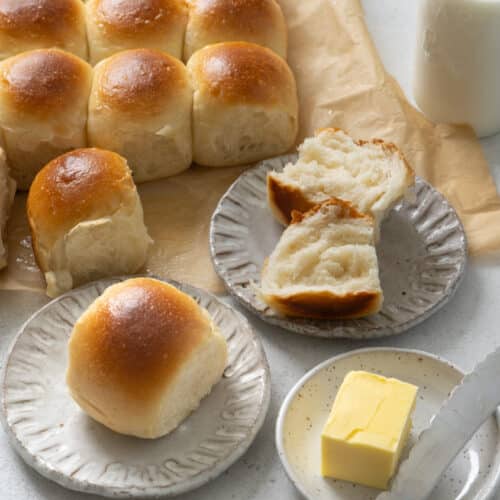
If you like this recipe and want to make more delicious bread like this one, I will highly recommend you try my Perfect Sweet Dinner Rolls. I developed this recipe for the perfect tender and fluffy dinner rolls, it's so good that it's one of the things friends and family request that I make the most!
Tips and Tricks
- Measure your ingredients with a kitchen scale! Especially for flour and liquids, because your one cup can be very different from my one cup.
- Start with cold liquid - I learned this from professional bakers in Taiwan. Since the dough needs a lot of kneading, using cold liquid prevents the final dough from becoming too warm and negatively impacting the resulting texture of the bun. During the summer time, I will even put my milk and water in the freezer for 30 minutes before incorporating them.
- I like to use the Autolyse method, which simply consists of allowing the dough to rest for 30 minutes before adding salt and butter. This will shorten the mixing time later and help your dough to pass the windowpane test faster.
- The best proofing temperature is between 80 - 90°F (26.5 - 32°C). If your indoor temperature is too low, you can proof your dough in a sealed oven along with a separate glass tray filled with boiling water on the bottom rack.
- The actual baking time may depend on your oven. Ultimately, you're done once your bread's internal temperature reaches 190°F (87°C). Don't over bake!
- In this recipe, I use a 1.5lb pan, with dimensions of 10" x 5" x 3". If you use a 1lb pan (8.5" x 4.5" x 2.75"), see the table below to convert the amount of each ingredient.
| 1 lb loaf pan | 1.5 lb loaf pan | |
| bread flour | 350 g | 500 g |
| sugar | 28 g | 40g |
| instant yeast | 1 tsp | 1½ tsp |
| water | 160 g | 225 g |
| milk | 80 g | 115 g |
| salt | 6 g | 9 g |
| unsalted butter | 18 g | 25 g |
Recipe FAQs
No, bread flour is necessary for the best results in this recipe.
I think the texture of this bread is perfect so I wouldn't change it.
If you want to make milk bread rolls, check out my milk bun recipe.
If you can't finish the bread in one day, the best way to keep it fresh is to freeze it. You can slice it first before storing in the freezer and only reheat (in a toaster or toaster oven) the amount you want each time.
Happy Baking!!
Don't Forget to Try
I would like to hear from you! If you make this recipe, please consider leaving a star rating and comment in the section further down the page. Stay in touch by following my Instagram and Pinterest!
Easy Milk Bread Loaf
Equipment
- loaf pan
- Stand mixer
Ingredients
- 500 g bread flour, 3¾ cup
- 40 g sugar, 3 tablespoon
- 1½ tsps instant yeast
- 225 g cold water, a little bit less than 1 cup
- 115 g cold milk, ½ cup
- 9 g sea salt, 1½ tsp
- 25 g unsalted butter, 1¾ tbsp
Other ingredient
- butter for coating the pan and brushing the bread
- flour for coating the pan
Instructions
Making Bread Dough
- Mix bread flour, sugar, yeast, water and milk in a stand mixer, kneading on low speed until the dough is formed.
- Cover the mixing bowl and let it rest for 30 minutes. Meanwhile, bring the butter out from the fridge, cut it into 4 pieces and leave it on the counter to soften a little.
- Add salt and continue to knead the dough for 1 minute.
- Add butter cubes and knead until the dough passes the windowpane test. (This step takes me about 7 minutes, with 6 minutes on low speed and 1 minute on medium speed. The actual time it takes you depends on your mixer.)
- Form the dough into a ball (it will be a bit sticky) and put it in a lightly greased bowl. Cover and let it rise in a warm place (between 82°F to 90°F) for 1 hour until it almost doubles in size.
Shaping
- Transfer the dough onto a working surface and cut it (don't pull it apart with your hand) into 3 even pieces. Form each piece into a ball. Cover the dough balls with a damp dish towel or greased plastic wrap, allowing them to rest for 15 minutes.
- Roll the dough out with a rolling pin to an oval shape and then roll it up to a log, do the same for the other two pieces, cover and let it rest for another 15 minutes. (See the pictures in the post)
- For each log, rotate the dough 90 degrees before rolling them out again into long rectangles and rolling each rectangle back up into a cinnamon roll type of shape.
- Grease a 10 x 5 loaf pan and coat with a thin layer of flour. Put the rolled up dough into the pan (see note), cover with greased plastic wrap and let it rise in a warm place until it fills 80-90% of the pan (this takes about 1-1.5 hours).
Baking
- Preheat the oven to 375°F in the last 20 minutes of proofing. Move the rack to about ⅓ of the way from the bottom.
- Put it in the oven to bake for 30-35 minutes. Loosely cover with a piece of foil after baking for 15 minutes to prevent the bread color from turning too dark.
- Remove bread from the oven and drop the pan on the counter top (from around two inches up) once to help prevent it from shrinking, then transfer the bread on a cooling rack right away. Brush the top with melted butter and let it cool for 15 minutes before enjoying.
Notes
- Measure your ingredients with a kitchen scale! Especially for flour and liquids, because your one cup can be very different from my one cup.
- Start with cold liquid - I learned this from professional bakers in Taiwan. Since the dough needs a lot of kneading, using cold liquid prevents the final dough from becoming too warm and negatively impacting the resulting texture of the bun. During the summer time, I will even put my milk and water in the freezer for 30 minutes before incorporating them.
- I like to use the Autolyse method, which simply consists of allowing the dough to rest for 30 minutes before adding salt and butter. This will shorten the mixing time later and help your dough to pass the windowpane test faster.
- The best proofing temperature is between 80 - 90°F (26.5 - 32°C). If your indoor temperature is too low, you can proof your dough in a sealed oven along with a separate glass tray filled with boiling water on the bottom rack.
- The actual baking time may depend on your oven. Ultimately, you're done once your bread's internal temperature reaches 190°F (87°C). Don't over bake!
- In this recipe, I use a 1.5lb pan, with dimensions of 10" x 5" x 3". If you use a 1lb pan (8.5" x 4.5" x 2.75"), see the table in the post to convert the amount of each ingredient. You might need to reduce the baking time by 5 minutes.
You only need to half the salt for table if it's volume not weight.
Thank you so much for the recipe. This is the best bread recipe I have ever made so far. I doubled the recipe. The bread was so soft, pillowy and fluffy. Thanks once again.
Thank you Shallum! I happy to hear you like it 🙂
The best bread ever! This is my go to daily bread recipe. My family can’t get enough of it. It’s so soft and fluffy, the taste is out of this world. Thank you for sharing the recipe.
Thank you so much, Jill! I'm so happy to hear you and your family like it 🙂
Thank you so much for the recipe
This was my first time baking bread from scratch and I could not be happier!!! I sat in the kitchen for like 15 minutes staring at the finished loaf in excitement 🙂 The bread came out very soft and fluffy, with just the slightest crunch on the outside. If I could rate more than 5 stars I would, thank you so much for the recipe!!!
Congratulations, Matt! I'm so excited for you. After making breads for more than 10 years, I'm still very excited each time when the fresh breads came out from the oven 😀
Can I use all purpose flour?
Hi Aysha, yes you can; however, I highly recommend using bread flour for the best result.
Why do you use a mixture of water and milk, instead of all milk? Thanks.
Hi Jane, good question! I found it gives the bread a lighter and fluffier texture instead of adding milk only 🙂
Can I use active dry yeast instead of instant yeast?
Hi Kelsey, yes you can! However, I found using SAF instant yeast gives the bread a better texture.
I learned that active dry yeast should always be first activated. I always activate mine in whatever liquid a recipe has and in this case milk and water. I usually combine and bloom yeast there inside the oven, turn off but lights are off. Oh I also always give my yeast something to "eat" so I throw in whatever sugar the recipe requires. If none, I stir in 1 teaspoon of sugar anyway 😂
lights ON that is
Yea, i used it and the bread is beautiful. Activate it in warm water and sugar first, and use about 25% extra - so about a 1/4 tsp more - bread rises SO beautifully and bubbly 😍 its fun popping when rolling out
Why can’t this recipe be converted into milk buns? I’m vegan, so unfortunately I can’t make your milk buns as they contain eggs (unless you have a substitute?).
Hi Amane, if you want to make milk buns, you can replace egg with 20g of milk of your choice.
What’s the point of the egg?
Egg gives the bread a richer flavor and softer texture.
Reading comments to how how this turned out for others. But I don’t see eggs listed in the step or ingredients. Has the recipe changed since then?
Hi Elizabeth, you don't need egg for this recipe.
Made this for a coworker I was so worried about using cold milk and water with yeast but it turned out perfect…I probably could have done a better At shaping them but it was perfect
Hi Sherrey, I'm glad it turn out well! Using cold milk and cold water when making milk bread is the one of the secrets of making delicious milk bread!
I have a question, when I bake the bread, should I put egg wash on the top?
Hi Emma, you don't need to brush egg wash on top of the bread, just brush some melted butter on top after baking.
Do I have to use instant yeast? Can I just use regular active dry yeast? And if so, are the measurements and instructions the same? Thanks!
Hi Lindsey, yes you can! If you use active dry yeast, use 1 3/4 teaspoons instead. Although I found using SAF instant yeast gives the bread better texture.
can I uses 1 3/4 active dry yeast with the cold mixing? or do i need to proofing first?
Hi, I think it should work, but I will recommend mixing the yeast with 2 Tbsp of water in a small cup before mixing it with the rest of the ingredients, just to be safe.
Making it for the second time this week! 😊
Can I proof the dough overnight in the fridge?
Hi Bethany,
Yes, you can! I actually prefer to do the first proof in the fridge. Not only does it save me some time, but it also gives the bread a better texture. Just be prepared, the second proof will take longer since the dough is cold.
hello - this recipe is great! If I wanted to make rolls instead what weight should the dough balls be split into, and how long should they be cooked for?
Hi, please see my roll recipes https://cookinginchinglish.com/perfect-sweet-dinner-rolls/ or https://cookinginchinglish.com/asian-bakery-style-dinner-roll/
The dough turned out too dry and did not rise during the 30 minutes, any advise?
Hi, Jenn, I'm sorry to hear that. Did you measure your ingredients with a scale? Also, it usually takes about 1-1.5 hours to proof the dough, you might not see much difference in the first 30 minutes. However, if your dough does not rise at all, it's probably because the yeast is not active or the proofing environment is not warm enough.
this is the prettiest loaf I've made yet! We're at 4300 ft altitude and it rose beautifully. wish I could figure out how to post a picture.
That's awesome, Vicki! I'm so happy to hear that 🙂
This was SO delicious and much easier than other milk bread recipes I’ve tried! I’ll definitely make again. Thanks!
I made this! only had dry active yeast so I read what said just add more the ratio was different..well didn't say to proof it..( I did) turned out Great I believe it will be my go to bread took a little more time but worth it!
I made this two days ago, and it came out amazing. Would it be possible for me to make the dough and then bake it the next day? I want to bring it to my mom in the late morning and won't have time for the full recipe.
Hi Chris, I'm glad to hear that. And yes, you can make the dough the day before, let it do the first proof in the fridge overnight, and continue the rest of the steps the next day. The final proofing time will be longer as the dough is cold. I hope your mom will enjoy the bread! 🙂
I may have missed something but dies this recipe make 1 or 3 loaves?
Hi Debs, this recipe makes 1 loaf of bread.
This bread is fantastic! It comes out great every time and my family loves it and requests it. It is great toasted too. I highly recommend it!
Came out great! Did it all by hand and the dough was really sticky, which kinda worried me. Tossed it in the fridge a few times so it could rest/firm up a little before kneading and it did the trick! Also left it in the fridge for its rise. Will definitely try this again!
Kneading by hand is a lot of work! I like the idea of resting in between kneading, it definitely makes the whole kneading process easier. I'm glad it turned out well!
I baked it again but replaced the water with milk. Added another 10% bc of the solid content in milk. Didn't do a side by side comparison or anything but it still came out great! The dough was also a lot less sticky. I wasn't sure if it was supposed to be like that so I added a little extra milk on top of all that. If you were to do this, how much milk would you have added?
Hi Ryy,
Thanks for sharing your experiment! I would say adding 10% more is a good starting point, but you also need to consider other factors like the brand of flour you use, the humidity in the house... The best way is to see the condition of your dough and adjust accordingly. Hope it helps 🙂
This was the first bread recipe I've ever made and I've made it several times since. It's so delicious and simple to follow! I absolutely love it and my family asks for it all the time! Thanks for giving me the confidence to keep baking!
Thank you Victoria for your kind word! It means a lot to me 🙂
I’ve been making bread for awhile and this is the BEST recipe I’ve tried. It’s now my “go to” and my hubby and kiddos love it.
I’d like to try freezing the dough. Do you (or anyone else) have any experience with freezing this dough? I know it can be done with other bread dough,
Thank you so much, Loren! Regarding to freezing the dough, I've tried doing that before for my dinner rolls, but I found it's hard to control the baking time, and the rolls weren't as soft because of the longer baking time. I usually just freeze the breads once they cool down.
turned out amazing! thank you for this recipe <3
Excellent recipe, my bread turned out perfect! (tagged you on Instagram, @havefungetstrong)
Can I use 2% milk? Thanks
Yes!
Great thank you. RE: Shaping, set 2. Using the rolling pin - dough was sticky that it kept sticking to the rolling pin. Can I add flour on the surface and rolling pin? Rolling pin - which is better? Marble or wood? Thank you.
Hi, you can add a bit of flour on the working surface and the dough. You can also try putting the dough (covered) in the fridge for 20 minutes before rolling. In terms of rolling pins, either one is fine, just choose the one you prefer.
Thanks so much. If I put it in the fridge will it affect the quality of the bread?
No problem! No it won't 🙂
I just returned from a trip to Singapore and had been enjoying Kaya toast daily there. I was craving some homemade bread to eat with my Kaya jam, and my husband sent me this recipe. I’ve always been intimidated by bread making, as I thought it would be too difficult for me. I have made this recipe twice now in the past 2 months. Thank you for sharing this delicious recipe!!
Hi Juliet, thanks for giving my recipe a try! I'm glad to hear it turned out well. Btw, I also LOVE kaya jam!!
Hi ,
I have no butter and I really wanna make this bread . All I have is olive oil and vegetable oil can I use that as substitutes. And if so how much should I use .
Thank you .
Hi Katie, butter is very important for this recipe, I would recommend you get some before making 🙂
I want to make this bread recipe and uses bread for my Señorita rolls that I make. Señorita rolls are sweet buttery rolls. Do you think it’s going to affect the bread if I shape the rolls and put them in the fridge overnight and bake the next day? Or even if I was too pro the dough and then stick it in the fridge overnight.?
Hi Ellie, I personally prefer doing the first proof overnight in the fridge, then shaping the dough, letting it do a second proof, and baking the next day. I’ve tried doing the second proof in the fridge after shaping and baking the following day, but it required a longer baking time and resulted in a drier loaf. That’s just my experience, though, feel free to experiment and see what works best for you!
Hi Edwina, i just returned from a trip to Taiwan and was delighted to find your website, I started with your Milk Bread and it turned out perfectly! I could not be more pleased! I've made it twice. I'll be trying the custard buns and many other things. I'm returning to Taiwan in January and will continue to try out your recipes. I appreciate that they are authentic - good food takes time and the recipes honor a love of real food. No shortcuts and some skills that need practice are worthwhile. Not everything needs to be fast and easy!
Thank you so much, Carole, for your encouraging words! Feedback from readers like you really motivates me to keep sharing recipes.
Can I make this bread with a hand mixer (not a stand mixer?)
Hi Betsy, you will need a stand mixer for this recipe.
Betsy this is half a year later but wanted to say I've made this recipe using a hand mixer with the dough hooks attachment and the bread has turned out great each time! I use the hand mixer for most of the kneading and when it's no longer super sticky I switch to kneading by hand using the stretch and fold method.
I tried the recipe, and I went wrong somewhere. The texture of the bread and the color of the bread did not match the one you had in your picture. I know that I can do better during spoofing (it was not warm enough), but where else can I improve so that the outcome matches yours?
Hi Pureum, I’m sorry to hear that. I wish I could see how you made it so I could help identify what might have gone wrong. I’d recommend reading through the entire recipe carefully before starting. If you’re new to bread making, it does take a bit of practice to get consistent results, so don’t be discouraged!
I've made a lot of bread in the last 20 years but after making this bread, I can say with 100% certainty that this is the best bread recipe I've ever made. I made 2 loaves and they were both gone in less than 4 hours. This bread recipe goes beyond "WOW". This is the only bread recipe I will ever need from now on. Thank you so much!
Hi Tish, thank you so much for trying my recipe, I'm so happy to hear you like it 🙂
All the positive feedback back has me wanting to try your recipe. I’m curious if I could make more “rolls” than the three you demonstrate? I’d like to make pocket sandwiches with beef bulgogi & scrambles eggs. By making more rolls, I could pull off a roll, cut part way into it and then stuff it with the filling. What are your thoughts ?
Hi Lisa, great question! I’d recommend following the instructions as written for the best results. If you’d like to make pocket sandwiches, an easy option is to cut thicker slices and create a pocket from each slice. That way, you can still fill them with beef bulgogi and scrambled eggs without changing the structure of the rolls. Hope that helps!
Hi can I make this in the breadmaker? Unfortunately I don’t have an oven 🙁 also if I use all purpose flour do I add vital wheat gluten?
Hi, unfortunately I don't own a bread machine, so I'm not sure if it will work.
Hi! I did all the steps in a breadmaker, except for the actual baking which I did in an oven.
The dough rises like crazy, so my feeling is that it may spill out of it 🙁
Could I use this as the base for pineapple buns? These ingredients and processes seem easier than the other milk buns recipes!
Hi Dutz, I think it should work; however, I would recommend using the dough that I use for my pineapple bun recipe.
Just took my loaf out of the oven - it looks and smells amazing. Great recipe, easy to follow and precise! Thank you!
Thanks Cornelia! Fresh bread is the best 😀
Can I use a closed shokupan?
Hi Katie, do you mean a bread loaf pan with cover? Yes you can, but please see the ingredient measurement adjustment table for your reference.
I read the instructions a bunch of times but I didn't see anywhere to activate the yeast
so I just mixed it in with the ingredients before the first 30 minute rise is this okay?
Hi Gabrielle, I use instant yeast, and I add it along with flour and liquid, please see step one under Making Bread Dough.
My husband has mastered making mantou thanks to your recipe so I knew this milk bread recipe would work just as well and I was not disappointed! Thank you for all the tips and tricks they really helped.
That's awesome!!
Absolutely love this recipe! We make a loaf and finish it same day. I went out to get another bread pan so I can double up!! I made this using my Ninja food processor and it worked well if you try it, mind the heat. The motor gets hot, making the dough hot, melty and a sticky mess. let it cool down between cycles.